My blog has moved!

BREAKING NEWS!!!!
My blog has moved...Please visit me over at my new blog home:
http://www.chaosserveddaily.com/

You can sign up to follow via email or other paths there, and, if you do, please leave me a comment so I can thank you...and follow you back, if you'd like! Hope to see you there!

Friday, January 6, 2012

My Favorite Muffins

I don’t, as a rule, like muffins. I’m not sure why…I love scones, biscuits, cake, all those things that have some muffin characteristics. I just don’t care for them. Except these. They rock.
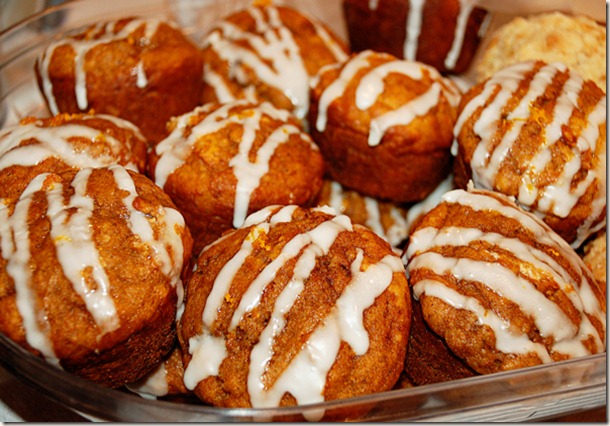
DSC_0003 Banana-Pumpkin Muffins

4 Tbsp butter, melted
1 cup sugar
2 eggs
1/2 of a 15 oz can of pumpkin
1 banana, mashed
1/2 cup plain yogurt
1 3/4 cups white whole-wheat flour (I use King Arthur brand; regular whole wheat will be too heavy, so if you don’t have white whole wheat, use 1 cup white, 3/4 cup whole wheat)
1 tsp baking soda
1/2 tsp salt
1 Tbsp pumpkin pie spice
3/4 cup mini chocolate chips

Glaze:
2 cups powdered sugar
2-3 Tbsp milk
1/2 tsp fiora di sicilia (see explanation below!)

Mix together butter, sugar, eggs, pumpkin, banana, and yogurt. Stir dry ingredients together in another bowl and add to butter mix. Fold in chocolate chips.

Use an ice-cream scoop to fill greased muffin tins about 2/3 full. Bake at 350 degrees for about 20 minutes, until a toothpick inserted in center comes out clean.

After I made these, I decided they were too plain. So I made a glaze using fiora de sicilia, which is a vanilla-citrus extract from King Arthur Flour. It gives an amazing flavor to sugar cookies, frostings, whatever you usually use vanilla in and would like to tweak a bit. You could use just vanilla, orange extract, or a combination.

I put that in a ziploc, cut the corner, and drizzled on top. Then I used my microplane and added just a bit of orange zest on top. It was exactly the finishing touch they needed.

And then I sent them off to work with the hubs because it’s Friday and that’s the only commander’s wife-ish thing I do at this battalion…treats every Friday. A few fell out, though, so the rest of us had them for breakfast…yummy!

Thursday, January 5, 2012

Because You Always Need a Birthday Card Idea

…And because I really like this pennant punch and forget to use it.

I’ve been so focused on holiday stuff, it’s as though I thought birthdays would stop coming as a convenience to me. But they didn’t. Kids, relatives, friends…all sorts of birthdays this month. Here’s a quick card with very little stamping and a few extra touches that take no time at all.

bday-pennants

All Stampin’ Up supplies: A Little Birthday Cheer (retired)
Whisper White, So Saffron, and Wild Wasabi cardstock; Just Add Cake DSP
Modern Label, Petite Pennant Builder, and Corner Rounder punches; Rhinestones;
White Signo Gel Pen; Tangerine Tango Pompom Trim (retired, but on the clearance rack!)

The stamp set is retired, but, of course, you could use any sentiment set. I popped the middle pennant and the sentiment up with dimensionals, and used glue to attach the pompom trim. It’s on the Stampin’ Up! Clearance Rack, that amazing sale which ends TODAY!

And, no, my soon-to-be-17-niece, this is not your birthday card. I’m saving yours to post after your birthday, so you’ll be surprised. I’m such a good aunt.

Happy Stamping!

Making a Baby (card)

baby

All Stampin’ Up: Button Buddies, Stitched(retired), and Short and Sweet stamp sets
Crumb Cake, Melon Mambo, and Whisper White Cardstock; Welcome Neighbor DSP (retired)
Melon Mambo and Crumb Cake markers; Signo White Gel Pen
Scallop Circle, Corner Rounder, Modern Label, and 1 3/4” punches; Rhinestones; White Gel Pen

It makes me happy to make baby cards…and I don’t get to very often, being away from the operational Army. As you know if you’ve ever been associated with the military, there’s almost always a plethora of babies. Not so much here in the civilian world. I was thrilled when we got a birth announcement from husband’s cousin and immediately made her a card.

Since this is pretty self-explanatory, I’ll just talk about my favorite tool I used…my white gel pen. Often, when I finish a card, it still looks a little unpolished to me. I find adding a little stitching or a hand-drawn line of flourishes peps it right up and truly finishes it off. I’ve tried many different (meaning cheap) pens from craft stores and whatnot, but I have to say Signo Uniball that Stampin’ Up sells is by far the best..thickest line, most opaque coverage, and it doesn’t dry out. I store it point down in my tool carousel. It’s item 105021 and it’s $3.95. Consider adding it on to your next order, if you don’t already have one! I’m sure the same pen is available at scrapbooking/stamping stores, as well.

I’m finally going to organize my craft room today…it was on my “to do” list all of Christmas break, but never was accomplished. Today, Princess Thundercloud and I are home alone with nothing to do and all day to do it. Until I look at the laundry hamper, the dishes, the carpets…..

Tuesday, January 3, 2012

Cold Play

As I may have mentioned, we have been the tiniest bit impatient for our snowy Wisconsin winter to begin. We’ve had a couple of small snows, just an inch or so, nowhere near enough to go sledding. Needless to say, as the snow began to accumulate while we were watching the Packers on New Years Day, we were beyond excited. DSC_0036DSC_0051 Unfortunately, a blast of arctic cold air arrived with the snow. Funny how that works. We waited until mid-morning on Monday, but then just had to test out the hills in our yard, frigid temps or not. DSC_0015e-sled We had a blast, even though the grass was poking through in a few places. We ended up with close to 3 inches and it packed nicely for sledding runs.

DSC_0027 DSC_0021 We were out for about an hour, then in for hot chocolate and peanut butter and honey sandwiches and naps, then back out in the afternoon. Everyone slept well last night!

DSC_0005 DSC_0052 The hooligans are back at the sledding hill today. They raced home from the bus to put on their snow gear…they have to wear it at school, so it was a drippy mess inside their backpacks. Nothing was damaged, though…it’s not like they’re carrying around the first drafts of their novels in there or anything.

I think they need supervision…I can hear the snow calling my name….but here’s the scrapbook page I made from yesterday’s adventures.

New-Year-Snow

Monday, January 2, 2012

More Effective Than a Snow Dance

Here’s our family Christmas photo for this year…

Having moved from Washington State to Wisconsin last summer, we sold the kids on the move by telling them there would be tons of snow here. They’re sledding fiends…we made the two hour drive to Mt. Rainier many times last winter to get our sledding fix. To say that we’ve all been disappointed by our sledding-less winter thus far is an understatement.

Having lots of time that I would rather have spent sledding but couldn’t, I finished our Christmas baking, crafting, and gifting a few days early and was chatting with my friend Krista. She told me about a coffee filter wreath she’d made for a fundraiser, and that gave me a great idea for a door decoration in our snowless Wisconsin.

Had I only known…as soon as this snowman was complete, the snow started to fall! It’s only a couple of inches so far, but the kids did manage to sled a little yesterday.

I bought 3 different sized wreaths from Dollar Tree (one was grapevine, one was floral foam, and one was styrofoam, but they were covered, anyway, so who cares?) and 4 packages of coffee filters. The scarf was an extra I had from making them for my boys for Christmas…the width of fabric made 3 scarves instead of 2. The eyes and mouth are pompoms of different sizes and the nose is just a cone of paper. I’m still looking for a fake carrot to put there. The hat is a foam one from the craft store…I just cut the back brim off so it would sit flush against the door.

You can find tutorials on coffee filter wreaths online. I just folded each filter in half, then again, then again, folded the point a little, and hot-glued them in place. My sweet husband helped with the folding and lots of encouragement. It took 3 nights of watching Christmas movies, folding, and gluing. But I’m quite pleased with the result…I’m sure the movers will be thrilled in a couple of years, too, trying to figure out how to pack this. ‘Cause we’re not making another one!

On a different topic, I’ve failed (again!) to point out that Stampin’ Up! is having a huge online clearance sale. They’ve changed the body of their punches so that they stack, and, as a result, all the old body style punches are vastly reduced in price. This suits me fine, since my punch storage is designed for the old style, not the new. And I’m all about saving money, after all!

If you’d like to check out the savings and deals, you can just go to my Stampin' Up! website. You can shop 24/7 directly from there, and the clearance ends on 5January, so don’t dilly-dally!

Thursday, December 29, 2011

Prospero Año Nuevo…

If you’re making salsa, shouldn’t Happy New Year’s be in Spanish, too? So there you go.

I always make this Good Luck Salsa for New Year’s neighbor gifts. Sometimes it makes it to my neighbors. Sometimes we devour it first. We’ll see what happens this time. I’ve seen similar recipes called Dixie Caviar or Texas Caviar, but I prefer to mention the luck the black-eyed peas will bring for 2012.

Salsa Good Luck Salsa

2 cans black-eyed peas, rinsed and drained

1 can yellow hominy, rinsed and drained

1 can petite diced tomatoes, fire-roasted or garlic and onion

1 green pepper, diced

1 onion, diced

1 can green chilis (or a small jalapeno, minced)

1 cup fat-free Italian salad dressing

2 cloves garlic, minced

1/4 cup cilantro, finely chopped

In a large bowl, stir everything together. Chill and let the flavors meld for a day or two. This keeps in the frig for up to a week.

To gift it, put in jars and embellish as desired. I put the ingredients on the back of the tag, along with instructions to keep it refrigerated. I downloaded the tag for free from Custom Printables, here. They design some really fun and cool things there…check it out!

This is a fun and savory way to get your black-eyed peas on New Year’s Day, if you’re not a fan of Hoppin’ John or other standard ways to prep them. Of course, you’ll still need your collard greens for wealth, but at least you’ll be lucky, so there’s that.

Wishing you all a fun and happy 2012!

Friday, December 23, 2011

Wishing You a Very Merry, Joyful Christmas!

Stay-Calm

As I’m finishing up the last of my Christmas baking, wrapping, and crafting, just wanted to take a moment and say thanks for all your support and patience as I’ve gotten my blog up and running. It’s been a great experience, and a much needed creative outlet! This truly has been our motto throughout this year of changes and adventures…and adapting to being country mice, not city mice after many years. It makes a great mantra, if you’re looking for a calming message to repeat to yourself…over and over and over….in my case!

I hope you and yours have a fabulous Christmas, filled with blessings and fun!

(By the way, to give credit where it’s due…the supplies for this digi-scrap page all came from DesignerDigitals.com, if you were wondering. Which I’m sure you were, having nothing else to think about 2 days before Christmas.)