My blog has moved!

BREAKING NEWS!!!!
My blog has moved...Please visit me over at my new blog home:
http://www.chaosserveddaily.com/

You can sign up to follow via email or other paths there, and, if you do, please leave me a comment so I can thank you...and follow you back, if you'd like! Hope to see you there!

Monday, June 11, 2012

Chewy Toffee Oatmeal Cookies

Generally speaking, I’m not a cookie fan.  Too bad for my hooligans, right?  I do frequently make cookies, but I send them in to my GI Joe’s work every Friday, so the kids just get a couple each.

Last week, I made a double recipe of my favorite oatmeal cookies, so I could send some, we could eat some, and I could freeze mounds of cookie dough to bake later.  I love these because they combine the tartness of cranberries, the chewiness of oatmeal, and a bit of both white and milk chocolate, along with the buttery crunch of toffee. This cookie can be all things to all people!

DSC_0018

Chewy Toffee Cranberry Oatmeal Cookies

Yield: about 3 dozen 3” cookies
1-1/2 cups white whole wheat flour
1 tsp baking soda
1 cup (2 sticks) butter, softened
¾ cup granulated sugar
¾ cup packed brown sugar
1 egg
1 tsp vanilla extract
1-1/2 cups oatmeal
1 cup dried cranberries
1 cup toffee pieces (with chocolate)
1 cup white chocolate chips

1. Preheat oven to 350 degrees.

2. In medium mixing bowl, cream together butter and sugars, then add egg and vanilla. Stir in flour and baking soda. Add oatmeal, cranberries, toffee, and white chocolate chips and stir until well combined.

3. Drop dough by large tablespoons onto baking sheet. Bake 9-12 minutes, until lightly browned. Let cool on baking sheet for a minute or so, then remove to wire rack and cool completely.

Click here for the printable recipe
 

Enjoy trying these, or whatever you’re doing today!

Friday, June 8, 2012

First Day on the Job as Cruise Director

Well, school’s out, so I’m on my new full-time job…entertaining my hooligans for the next 3 months. Woo-hoo!  Actually, I am looking forward to having no schedule every day.  Of course, a week from now I’ll no doubt be making a countdown calendar to September 4.

To kick off summer vacation, we made a string maze for them to follow to get to their summer surprise packages.maze
They each had a different color string (red, white, or blue) tied to a popsicle stick with their name on it.  They had to wind them up to get to their gifts.
tree-winding
My GI Joe did the strings for the boys, and they were quite difficult in places…but the hooligans were remarkably patient.

princess
Except for Princess Thundercloud, who frequently hurled hers to the ground and “Hmmph”-ed loudly. The boys were very willing to help her, which I thought was pretty sweet.  Again, it’s the first day of summer…that will change, I’m sure.

DSC_0013
He definitely had the toughest one to follow.  He was feet from the prize and could see it from here, but kept winding.

fastest
The first to finish, he went off to help his siblings and waited to open his present.  Amazing!

loot
Their loot included water pumpers for the lake, educational card games, lots of books and a couple of workbooks, art supplies, a couple of toys, and a candy bracelet (left from Halloween, but they didn’t care).  Oh, and they each got a whole pack of gum.  I’m pretty sure my kids would walk to town and back if they were promised gum. And "town" is 11 miles away.

summer coupons copy
One thing I included that they seemed to think super cool were these coupons for each of them.  This way, they can have time alone with one of us, and know that the others will have the same chance.  That doesn’t mean they won’t squabble about it while we’re doing it, but they thought the idea was great!

This little project took us about 10 minutes to string, then about an hour for the hooligans to follow their strings, wind them up, and peruse their treasures.  As usual, GI Joe had his doubts, but it proved a fun way to kick off vacation!

I’ve got to get back to impressing my new bosses with my entertainment skills…after I do laundry and go to the post office and Costco, that is.  Have a great weekend!


The Taylor House

Thursday, June 7, 2012

I’m Not Late…School Ends Today!

I know many of you have kids who are already out of school, but I kept changing my plans for end of year teacher gifts. Darn that Pinterest!

As the kid of two teachers, I also know teachers don’t want a whole bunch of “stuff” or usually homemade food.  I mean, they've seen your kid all year, doing heaven knows what gross thing. I’ve worked hard all year to convince my kids’ teachers they can eat what I make (pointing out at every opportunity that the kids don't help with food gifts)…and they seem to be!  I tried to make a little something for each teacher, then included it with their gift.

DSC_0005
For all the “specials” teachers (art, music, gym, etc) we made these apple and dip combos, with a tag made from clipart I found at Two Yellow Birds.

DSC_0003
For the dip, I mixed 8 oz softened cream cheese, 1/4 cup brown sugar, 1/2 tsp vanilla, and a dash of cinnamon.  Each batch filled three of the little Glad containers.  I think they’re 4 oz ones.  You could also use Mason jars, but I liked these summer-themed Glads.  I put the dip in a large Ziploc, cut the corner off, and piped it into the containers, to be neat. Then I just sprinkled each with Heath bits (they’re with the chocolate chips at the grocery store).

DSC_0007
For the teachers, I made S’mores Buckets.  In the bucket are chocolate bars, graham crackers, and marshmallows, and a gift card to a baby store.  The second grader’s teacher is expecting, so I included a set of thank you notes I stamped.  The front is a subway art you can find at Happy Go Lucky.  I just resized it and changed the colors a bit using Photoshop.  It has the ABCs throughout it, which I thought fitting for a teacher.

DSC_0009
The kindergarten teacher has three kids, so in her basket I included this set of 101 Boredom Busters.  I figure she’s entertained my kid all year, so I owe her a little bit of entertaining hers!  You can print the ideas here, at Shabby Beach Nest.

DSC_0011
For the preschool teachers, Princess Thundercloud helped me put together these sun hats with beach towels, chocolate, and a magazine so they can enjoy their summer.

DSC_0012
Last but not least, we made these little treats for their classmates.  I copied the clipart from this post at Itsy Bitsy Paper, then made small tags in Photoshop.  The treats are Scooby Graham Snacks. Super quick and cute.

If your kids are already out of school, you can always pin these for next year…or take a bucket of s’mores along as a hostess gift.  And you know you’re gonna need those 101 ideas to entertain your own kids this summer!  Have fun!


Wednesday, June 6, 2012

Feeling Tart-y

I know, I’m rushing the season on tomatoes, but I bought some small vine-ripened ones that actually taste like tomatoes.  I used them to make a tart for dinner last night.

DSC_0033
It was a perfect night to eat on the deck, the only thing missing was my GI Joe.  On the other hand, if he were home, I probably would have made something more manly.  It was also National Cheese Day (but that’s every day here in Wisconsin!), so I felt justified.  The hooligans loved this, by the way.  We had a green salad and fresh pineapple with it.

Gorgonzola and Tomato Tart

  • 1 9 inch refrigerated pie crust
  • 1 tablespoon extra-virgin olive oil, or olive oil cooking spray
  • Salt and freshly ground pepper
  • 8 ounces part skim ricotta cheese (about 1 cup)
  • 4 ounces Gorgonzola, crumbled (about 1 cup)
  • 1 large egg
  • 3 medium vine-ripened tomatoes, thinly sliced
Directions
  1. Preheat the oven to 400 degrees . Unroll the piecrust and press it into a 9-inch tart pan(or a pie pan will work, too). Prick the bottom of the dough all over with a fork, spray with cooking spray or brush with the 1 tablespoon of olive oil, sprinkle with pepper and bake for 10 minutes.
  2. In a medium bowl, stir together the ricotta, Gorgonzola and egg until combined. Remove the tart shell from the oven. Spoon the cheese mixture into the tart shell and top with the tomato slices; season with pepper and bake for 25 minutes. Remove the tart from the oven and let cool slightly before serving.
If you’re not a fan of strong cheeses, you can substitute any soft cheese for the Gorgonzola.  I think this would be good if you brushed the shell with pesto before baking, then used a milder cheese such as Feta.

Now I can’t wait for my tiny tomato plants to start producing. Good thing I planted Early Girls, since I want instant gratification!

Click here to print the recipe

Tuesday, June 5, 2012

You’re Filling Dad’s Wallet?

Last year, we were getting ready to move halfway across the country as Fathers’ Day approached, and the last thing my husband (or I) wanted was something else to unpack. So I made him this nifty wallet, stuffed full of gift cards and a little cash.  Oh, and a photo of his hooligans.  It was a big hit, and came in handy several times during our jaunt across the Midwest.

DSC_0042
DSC_0043
I used digital stamps for the quote and the sentiment.  You can find the quotes here, at Basic Grey.  The sentiment is from Ali Edwards Holidays + Celebrations Hand-drawn Set and it’s found at Designer Digitals.


To make the wallet, cut Early Espresso cardstock to these dimensions:
1 piece 3” x 8-1/2” (cover), round the corners and emboss one side
1 piece 2-1/2” x 8”
2 pieces 2” x 3-3/4”
2 pieces 1-1/2” x 3 –3/4”

Making the faux crocodile cover is really fun.  To do it, cover your entire wallet cover with Versamark ink.  Sprinkle it heavily with clear embossing powder, then use a stylus to randomly draw lines through it, like a croc skin.  Blow off the crumbs of embossing powder, and emboss.  Ta-da!

Sponge all the edges with Early Espresso.  On the 2-1/2” x 8” piece, use 1/8” sticky strip or strong glue to add the pockets, lining up the bottom and outside edge.  Score the center.

Score the center of the cover piece (3” x 8-1/2”).  Use Sticky Strip to adhere the outside edges of the pocket piece, as well as the bottom, leaving about an inch on either side of the center, along the bottom, not adhered.

Embellish it with your sentiment, then fold it and fill it.  I left it under some heavy books for a day or two, to make sure it would stay closed.

The dad you give this to will be thrilled to have his wallet filled and not emptied by his offspring, I bet!


Monday, June 4, 2012

Graduates Galore

I suddenly realized that we actually do know several graduates this year.  With our family filled with little ones, I forget that we were OLD when we first became parents and many of our friends started families ten years before we did. So they have kids going off to college already.

I’m amazed and thrilled at the accomplishments of their offspring, and always want to design different cards for each graduate.  Here are a few of this year’s favorites.

DSC_0011
This set, Go Graduate, is retired, but it’s one of my favorite sets to pull out year after year.  I’m sure you can find it at an online auction or sale if you’d like to get it, too.  It’s a straight forward stamp and color.  I embossed the background using a Square Lattice folder and put Sticky Strip along the top and bottom of the image, then covered it with silver glitter.  It’s very glittery in person.

DSC_0006
DSC_0007

This card I made for one of our “Army family” offspring.  She’s immensely talented and artistic, and I woke up one day last week thinking this line from my favorite song would be perfect for her card.  I created the wordart in Photoshop Elements.  I think you can print it from here.

Forever-Young 
Then to make the card, I cut it out using a Sizzix Framelits and a size larger to mat it.  I used a retired DSP for the front and to make a gift card holder inside.  The lyrics I just printed out from Word.

DSC_0008
DSC_0009

Isn’t this a cool card?  It seemed complicated when I saw it in Stampin’ Up!’s monthly demonstrator magazine, but it really wasn’t.  It took about half an hour to finish, which isn’t bad for such a clever design. The cap part of it (the giftcard holder) is embossed using the Stripes folder, so it’s really interesting in texture as well as design.

Click here to download the instructions and template

So there you have it…three fabulous options for graduates…and they’ll probably not receive duplicates of these!

Friday, June 1, 2012

How We Do Bubbly

Largely due to my penchant for the drive-through coffee shacks prevalent in the Northwest, my hooligans have developed their own favorites.  In cold weather, it’s steamed milk with peppermint syrup (tastes like a candy cane) or peppermint hot chocolate.  When summer rolls around, they love Italian cream sodas and bubble tea.  We’ve been unable to find either here, although we haven’t looked very strenuously.

What is bubble tea?  It's a super sweet, milky, fruity cold tea with large tapioca pearls in it.  They're soaked in syrup and are almost like gummy candies.  You drink through huge straws so the "bubbles" fit through them.  I know, it sounds odd if you've never had it, but it's really quite enjoyable!

Italian sodas are super easy to make at home.  A little flavored syrup (like blackberry or lemon), top it with seltzer, and add a splash of cream, all over ice.  Bubble tea is a bit trickier, but we’ve found a version that will definitely suffice over the long, hot summer.
DSC_0001
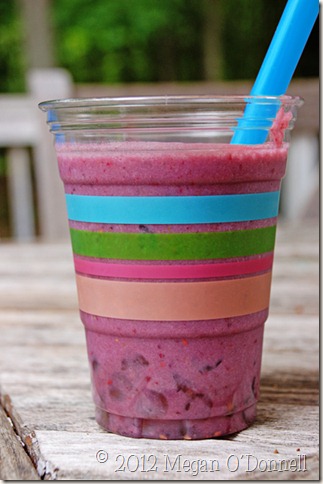
We don’t make traditional bubble tea at our house.  The hooligans do not need caffeine, as you’ve probably gathered from my posts.  Our version is more like a fruit smoothie, with bubbles.  You can find many good bubble tea recipes online, though, once you have your tapioca and syrup ready, if you want to make it with tea.

Pearls
Most importantly, you need tapioca pearls.  They're about the size of green peas, if you can't tell.  You can easily order these online, but I found mine at the local grocery store, in the Asian food section.  They were $1.05 for 14 oz.  That made enough for about 15 bubble teas.

Cooking the tapioca is the trickiest part of this, and it’s really not that complicated.  It just takes a little time. I cook one cup of tapioca at a time, which is enough for 5 or 6 bubble teas.  It keeps for a couple of days in the frig, but dries out quickly, even in the syrup.

To cook the tapioca:

1. Bring 8 cups water to a rapid boil in a large saucepan or stockpot.  When boiling vigorously, stir in 1 cup tapioca.  Lower the heat to medium.  You want to maintain a boil.  The tapioca will begin to float in a few minutes (not all of them, but some).  Put a lid on it and let it boil for about 30 minutes, until about half of the pearls are clear.  You’ll see what I mean when you do it.   Turn off the heat, leave the lid on, and let them continue to steam for another 30 minutes.
2.  Drain into a metal strainer and rinse with cool water until the stickiness is gone.  Pour into a lidded container (like a Rubbermaid) and pour bubble syrup over it.  I just keep them soaking in there, chilled, until I’m ready to use them.

To make the bubble syrup (while the tapioca is cooking):

1.  In a medium saucepan, combine 2 cups water, 1 cup granulated sugar, and 1 cup brown sugar,  Bring to a boil, cook 1 minute, then let cool to room temperature before pouring over cooked pearls.

Basic Bubble Smoothie

1 cup fresh fruit
1 cup ice or frozen fruit
2 Tbsp sweetened condensed milk
2 Tbsp bubble syrup
1/2 to 1 cup water, depending on how juicy the fruit is
3 or 4 Tbsp cooked pearls

1.  In blender, combine fruit, ice or frozen fruit, sweetened condensed milk, syrup, and water and blend until smooth. 
2.  Place cooked pearls in your glass and pour the smoothie over it. Serve it with a super fat straw! (I found these at Bed, Bath, and Beyond)

For the one in the photo, I used fresh strawberries and blackberries with frozen peaches.  The hooligans thought it was their favorite.  I’m just sayin’.

I’m sure I’ll be sorry I figured this out, since I’ll feel super guilty paying four bucks each when I could make them for way, way, way less. But isn’t that the way with any drink from a coffee shack?  Sometimes you just need the convenience and the fun of driving through somewhere and spioling yourself and your kiddos…and there’s nothing wrong with that!

Linking up at The Taylor House 
and The Frugal Girls
