My blog has moved!

BREAKING NEWS!!!!
My blog has moved...Please visit me over at my new blog home:
http://www.chaosserveddaily.com/

You can sign up to follow via email or other paths there, and, if you do, please leave me a comment so I can thank you...and follow you back, if you'd like! Hope to see you there!

Showing posts with label dessert. Show all posts

Monday, July 23, 2012

Warning: Sugar Induced Coma Ahead

Last week, I tried a few new recipes to send in to my GI Joe’s office.  The potato chip cookies from Martha were only so-so…a bit bland, we thought. Then I made a couple of variations of Rice Krispy treats from Redbook magazine.

The Salted Caramel Treats were pretty tasty, but, again, not the contrast of flavors I expected.  You can find the recipe here. I’ll definitely try them again, perhaps with more salt.

Redbook also had another recipe, for a Rocky Road version of treats.  I modified it a bit by adding peanut butter chips and crushed potato chips to cut the sweetness.  These were proclaimed awesome by the hooligans and soldiers alike, and the middle kid even insisted they needed to be on my blog “to share with the world.”

He obviously has an exaggerated sense of my presence on the web. They are darned good, though.

DSC_0003

Krispy S’Mores Squares

Yield: 24 squares Prep Time: 15 minutes
¼ cup butter
10 oz mini marshmallows
2/3 cup Nutella
½ tsp salt
6 cups Cocoa Krispies cereal
1 cup marshmallow fluff
1 cup miniature marshmallows
1 cup peanut butter chips
1 cup milk chocolate chips
1 cup crushed potato chips

1. Melt butter in large saucepan. Stir in marshmallows until smooth and melted. Add Nutella, salt, and vanilla. Stir in cereal.

2. Line a 13x9 pan with foil and spray with cooking spray. Pour cereal mixture into pan and press firmly into pan.
 
3. Spread marshmallow fluff on top, then sprinkle with remaining ingredients.

4. Preheat broiler. Broil treats for a couple of minutes, until marshmallows on top begin to brown. It doesn’t take long!

5. Let cool then cut into 24 squares.  These are super rich, so you may want to cut the squares in half. Or at least have a vat of black coffee standing by.

Click here for a printable recipe


Linking up to The Frugal Girls Chic and Crafty party

Wednesday, June 20, 2012

So This Margarita Walks Into a Bar…

…and makes a really yummy, cool and creamy treat, even without the tequila.

I recently hosted book club and made some delicious Strawberry Margarita Bars to serve as dessert.  Then we started drinking real margaritas and eating chips and salsa and I completely forgot to serve it. The family has enjoyed it for dessert, though!

This is my favorite kind of dessert for summer: No baking, very little prep time, and light in taste and calories.

straw-marg-bars

Strawberry Margarita Bars

1-1/2 cups crushed pretzels
1/3 cup butter or margarine, melted
1/4 cup sugar
1 can (14 oz.) fat free sweetened condensed milk
1 cup pureed strawberries
1/2 cup lime juice(I used bottled)
1 tub (8 oz.) Cool Whip Free, thawed
1 cup sliced fresh strawberries

1. Mix pretzel crumbs, sugar, and butter in 13x9-inch pan; press onto bottom of pan. Refrigerate until ready to use.
2. Combine condensed milk, pureed strawberries and lime juice in large bowl. Gently stir in COOL WHIP; pour over crust.
3. Freeze at least 6 hours. Remove from freezer about 15 min. before serving; let stand at room temperature to soften slightly. Serve topped with sliced strawberries.

How easy it that, I ask you?  Enjoy!

Click here for a printable version


Sharing this over at 


and The Taylor House

Thursday, April 12, 2012

A “Wow” Worthy Dessert

As my husband spooned this dessert into his mouth, he seemed torn about whether to eat it as quickly as possible or to savor every bite.  Now, after watching my soldier inhale his food for over twenty years, I know how military guys eat…quickly.  So this is the mark of a truly remarkable recipe…the desire to enjoy it slowly!
DSC_0058

This Lemon Blackberry Parfait is a bit of an homage to my dad’s favorite dessert.  When I was in high school, my mom was more than happy to hand over her recipe for Lemon Meringue Clouds.  I believe it originally came from my aunt Oma Sue.  After making round meringue “nests,” you topped them with a lemon curd and whipped cream mixture.

I like to think this takes those flavors to the next level.  The recipe look complicated, but really consists of easy, if a bit time-consuming, steps.  Following the recipe is a version using store-bought ingredients, if you prefer.

Lemon Blackberry Parfait

Swiss Meringue:

4 large egg whites, at room temperature
1 cup sugar
pinch of cream of tartar
1/2 tsp vanilla

1. Whisk egg whites, sugar, and cream of tartar in a heatproof mixing bowl set over a pan of simmering water until sugar has dissolved and whites are hot to the touch, about 3 minutes.
2. Remove from heat.  Beat on low speed, increasing to high, until still, glossy peaks form, about 10 minutes.Beat in vanilla.

DSC_0038

3. Preheat oven to 200 degrees.  Line two large baking sheets with parchment. Spoon about 2 cups of the meringue into a large ziploc bag fitted with a medium star pastry tip.  Pipe 12 to 16 long swirly shapes onto one baking sheet.  Spread remaining meringue 3/4” tick on other prepared baking sheet.
4.  Bake 20 minutes, then reduce heat to 175 degrees and bake another 35 minutes, until meringue is dry but still white.  Rotate sheets halfway through baking time. TUrn off oven and let meringue cool completely in oven.  If you need your oven for something else, they can also cool on a metal rack on your counter.  Set swirls aside and crumble the sheet of meringue.

Lemon Curd

6 large egg yolks
3/4 cup sugar
1 Tbsp finely grated lemon zest
1/2 cup lemon juice
1/2 cup unsalted butter, cut in pieces

1.  Combine yolks, sugar, lemon zest, and lemon juice in medium heavy-bottom saucepan. Cook over medium-low heat, stirring constantly with a wooden spoon, until mixture is thick enough to coat the back of the spoon, 8 to 10 minutes.
2. Add butter, stirring until melted and combined.  Press the mixture through a fine sieve into a bowl.  Spoon into a jar or other container and refrigerate until firm, at least 1 hour.

Other ingredients:

1 cup vanilla nonfat Greek yogurt
2 cups ripe blackberries
1 cup whipped cream, if desired

dessert-ingredients

To assemble parfaits:

1.  Combine yogurt and 1 cup lemon curd. 
2. Layer berries, lemon curd mixture, and crumbled meringue in serving glasses.  Top with whipped cream and meringue swirls.
Serves 6

To make a quicker version, use purchased lemon curd and vanilla meringue cookies.  Crumble the cookies, leaving a few whole for garnish in place of the swirls. Of course, I’m partial to the made from scratch versions of both, but either is a dessert experience you won’t soon forget!

Monday, April 9, 2012

Not Your Grandma’s Lemon Squares

My friend Danielle is one of the best cooks I’ve ever known.  She doesn’t think so, but I’ve never had anything she made that didn’t absolutely rock.  She made this Raspberry Lemon Shortbread Tart for our second son’s baby shower, and it’s been one of my favorite desserts ever since.

I make it into bars instead of a tart. Mostly so I can eat them without getting a plate and fork dirty. I’m lazy that way.  If you’d prefer to be all civilized and serve it as a tart, just use a springform pan rather than the 9x13 pan.

DSC_0052

Raspberry Lemon Shortbread Bars
12 oz frozen raspberries, thawed and drained well
1 stick plus 6 Tbsp cold unsalted butter, cut into pieces
1-1/4 cup granulated sugar, divided
1-3/4 cup all-purpose flour, divided
3 large eggs
1 tsp vanilla
Zest and juice of 1 lemon (about 1/4 cup)
1/2 to 3/4 cup white chocolate chips
Confectioners sugar, for dusting

1. Preheat oven to 400 degrees. In food processor, combine butter, 1-1/2 cups flour, and 1/2 cup sugar and pulse until coarse crumbs form.  Alternatively, combine using your fingers until crumbly. Press firmly and evenly into ungreased 9x13 pan. Bake until lightly golden, about 20 minutes.
2. Remove the shortbread from the oven and reduce oven to 325 degrees.  Sprinkle the drained raspberries over the crust.
3. In food processor (or medium bowl, if you didn’t use it to make the crust), combine eggs, remaining 3/4 cup sugar, lemon zest and juice, vanilla, and remaining 1/4 cup flour until pale yellow and creamy. Pour lemon cream over crust and sprinkle with white chocolate chips.
4. Bake at 325 for about 30 minutes, until custard is set.  Let cool, then dust with confectioners’ sugar for serving.

These bars combine the best aspects of classic lemon squares with the fresh surprise of raspberries and a hint of white chocolate. They’re sure to be a hit at your next get-together. Of course, you really need to make a batch for yourself, just to test the recipe first!

Makes 24 bars. Enough for you and a couple of others you really like.

Wednesday, April 4, 2012

It’s a Marshmallow World

Have you ever made (or, more importantly, eaten) homemade marshmallows?  You cannot even compare them to store-bought, they’re so much more…everything.  More delicious, more tender, more fun, more, more, more!DSC_0036
I’m not a big fan of store-bought marshmallows for snacking.  Of course, they’re great for roasting over a fire or making Rice Krispy treats.  Homemade are a whole other story, though.  And, (drumroll, please) they only have 2 Weight Watchers points for a 2” x 2” square…that’s a lot of marshmallow!  Have I talked you into it yet?

Dreamy Marshmallows

Powdered sugar
2 packets unflavored gelatin
1-1/2 cups granulated sugar
1/2 cup light corn syrup
Pinch of salt
1-1/2 tsp vanilla
Purple or red food coloring, optional
1. In mixer bowl, sprinkle gelatin over 1/3 cup cold water.  Let stand 10 minutes, while making syrup.

DSC_0006
2. In medium saucepan, combine granulated sugar, corn syrup, 1/3 cups water, and salt. Bring to a boil to dissolve sugar.  Lower heat slightly and boil 4 more minutes.

DSC_0011
3. Turn mixer on low speed and pour hot syrup into the gelatin in a thin stream until completely blended.  Increase blender speed to high and beat until doubled in volume and it becomes white, thick, and glossy.

DSC_0014
It takes about 10 –15 minutes, so a stand mixture is really helpful. Beat in vanilla and food coloring.

DSC_0005
4. While the mixer is working, prepare your pan.  In a 8x8 pan, spray cooking spray.  Then dump in powdered sugar and COMPLETELY cover it in as thick a layer as will stick.  This is important, since this is possibly the stickiest substance known to man.  It does wash right off hands, cabinets, mixers, whatever, since it’s really just sugar.

DSC_0017
5. Spread into prepared pan.  Another set of hands was helpful here, while I took photos.

DSC_0018
DSC_0023Wet your hands and you’ll be able to pat it into the pan.  Let sit 3 hours or overnight or dry a bit.

DSC_0030
6.  Using kitchen scissors, cut the marshmallows into strips, then cubes.  Toss them in powdered sugar to coat.

DSC_0033
Let them sit on wax paper until you’re all done cutting and tossing, then store in an airtight container.  They’ll keep for up to 5 days.

If you're thinking these are way too little bang for the buck, they're really not!  To actually make them, allow about 30 minutes, then after they're ready to cut, it takes about 10 minutes at most to cut and coat them with sugar.  Really. And everything cleans up so easily, because it's just sugar and water.

My helper was rewarded with getting to lick the spatula...she cleaned up well, too!


These are beyond fabulous with chocolate fondue or you can dip them in chocolate and let them harden.  I also like to substitute other flavors for the vanilla.  Peppermint, orange, strawberry, cherry, whatever extracts you like. Enjoy!

Tuesday, March 6, 2012

Fine (Faux) French Cuisine

DSC_0021 Saturday morning, we were treated to this winter wonderland as the sun rose. Never mind that it’s March and we finally had our first Winter Storm Warning of the season. We’re happy to have this view, any month!

Two of our favorite foods in the world are French Onion Soup and Creme Brulee. Not very patriotic of us, is it? But there you have it. Our cold, snowy Saturday provided a perfect opportunity for not one, but two favorite dishes for dinner!

This is probably the easiest recipe ever for French Onion Soup, and I know you’re thinking the onions won’t taste right without cooking them first. But they will! I promise. I was a doubter, too, before I tried it.

Crock Pot French Onion Soup

4 yellow onions, sliced thinly

4 Tbsp butter

6 cups beef broth

1/2 cup sherry

Provolone, Swiss, or your favorite white cheese

French bread (or we like ciabatta)

Turn the slow cooker on High, then put the butter in until melted. You could also just melt the butter and pour it in. Add onion slices, and toss to coat with butter. Add broth and sherry, turn it to low, and cook 6-8 hours, until onions are super soft and your whole house smells like onion soup. In a good way.

Place a slice of bread in a bowl, top with cheese, and ladle the hot soup over it. Alternatively, you can make it traditionally with a slice of bread and cheese floated on top, then broil. But you’ve already used a crock pot, why over achieve at this point?

By the way, you can make this on the stove, as well. Just cook your onions slowly in the butter until very soft, then add broth and sherry. You may need an extra cup or two of broth. Bring it to a boil to meld the flavors. This method takes about 45 minutes.

This serves 4, generously.
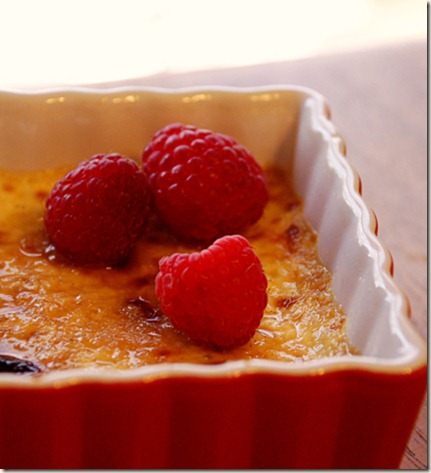
brulee For Valentine’s Day, I made my sweetheart his favorite dessert. I even bought pretty red ramekins for it. Oh, all right, I thought I needed them to brighten up the dreary winter. Now I use them every chance I get. Creme Brulee is so simple, yet people tend to hesitate to make it. Perhaps they’re looking at recipes with a calorie count. This recipe does not have that feature, so feel free to indulge!

Vanilla Bean Creme Brulee

(serves 5)

2- 1/2 cups heavy whipping cream

5 egg yolks

4 Tbsp sugar

1 vanilla bean (or 1 tsp vanilla extract, but that’s not as tasty)

Preheat oven to 300 degrees.

Combine egg yolks and sugar in a medium bowl. Whisk until light yellow.

In a large, heavy saucepan, heat the cream to almost boiling, stirring constantly. Remove from heat and slowly whisk into egg mixture. Slit the vanilla bean lengthwise and scrape the seeds out using a small knife. Stir into mixture.

Pour mixture back into the same saucepan and heat over medium-low, stirring constantly, until it coats the back of a wooden spoon, about 3 minutes.

Place ramekins on a sheet pan large enough to hold them with space between. Divide the custard between the ramekins and bake for 30 minutes, until firm in center. Chill for an hour, up to overnight.

About an hour before serving, mix 2 Tbsp granulated sugar and 2 Tbsp brown sugar and spoon evenly over custards. Broil under high heat until carmelized. Chill until serving, when the custard is cooled again.

Although it sounds like a lengthy process, it really doesn’t require much hands on time. Probably 30 minutes prepping for the oven, then another 15 to broil and chill again. About 3 hours total, counting cooking and chilling. Every time the hubs orders creme brulee at a restaurant, all I can think of is that I could make like a gallon of it at home for the same price…this is under $5, even counting the vanilla bean, which I buy at Costco fairly inexpensively.

Bon appetit…and I mean nothing faux about that sentiment!
