My blog has moved!

BREAKING NEWS!!!!
My blog has moved...Please visit me over at my new blog home:
http://www.chaosserveddaily.com/

You can sign up to follow via email or other paths there, and, if you do, please leave me a comment so I can thank you...and follow you back, if you'd like! Hope to see you there!

Thursday, May 3, 2012

You Like Me (at least one of you does)!

 
What a wonderful surprise…my friend Kathy over at My Creative Impulse awarded me a Leibster.  I was so happy, I made a couple of thank you cards to share:

poppy-thanks
This thanks card is designed especially for you, Kathy, using some of my favorite DSP (Beyond the Garden) which is retiring at the end of the month (and on sale). And you know how I hoard my favorites!

tommy-thanksHere’s another version, without the embossing and edge cutting, that I made for a young friend of ours. I made these on notecards rather than a standard 4-1/4” x 5-1/2” card, so he wouldn’t need to write as much.  He’s only eight, after all!

This super cute and cheerful DSP, Big Top Birthday, is also retiring.  Remember, once the retired accessories are sold out, they’re gone.  (Just a friendly, enabling reminder!)

Now, what’s a Liebster, you might ask?  As she explains (and her hubs is from Austria, so I think she knows):

The origins of the Liebster Blog Award are somewhat unclear, but the general consensus is that it originated in Germany. Liebster, means favorite or dearest, and the Liebster Award is designed to showcase bloggers with fewer than 200 followers. Upon accepting the award, the recipient must pass it on to five more blogs of note.

So after, much consideration (and the required research while reading all my favorite blogs) here are my top 5:

1) Veronica at MorningNooNight…she makes such yummy treats!
2) My friend-who-wishes-to-be-unnamed at The Small Soldiers,,,she makes me laugh with her observations on this crazy Army life we lead!
3) Sarah at From Freezer to Table
4) Chrissy at The Taylor House
5) Jen at I'm Crafty
 
Okay winners, here's what you need to do.

1. Thank your Liebster Blog Award presenter on your blog.
2. Link back to the blogger who presented the award to you.
3. Copy and past the blog award on your blog.
4. Present the Liebster Blog Award to 5 blogs of 200 followers or less who you feel deserve recognition.
5. Let them know they have been chosen by leaving a comment at their blog.
 
Thanks again, Kathy!  Funny backstory on our friendship to share:  We were next door neighbors for a little over a year in Washington.  We smiled and waved, but never really chatted.  When we were prepping our house to move out and turn it over to renters for a couple of years (until we can move back there), we really met Kathy and her Mr. Wonderful.  And she’s named him correctly, by the way.  He’s as handy as a pocket on a shirt (as my mom says) and one of the nicest guys we’ve ever met.

Kathy was also instrumental in my actually starting to blog.  She emailed to let me know Operation Write Home was hosting a hop last fall and wanted me to hop on in.  I wasn't quite ready, but it did give me a (gentle) shove into blogdom.  So I actually owe her more than one thank you card!

I’m so sorry that we wasted that year in ignorance…who knew an amazing crafter was living right next door, as well as a funny and charming friend?  Just one more reason that I can’t wait to move back!

Wednesday, May 2, 2012

The Best Cake Ever

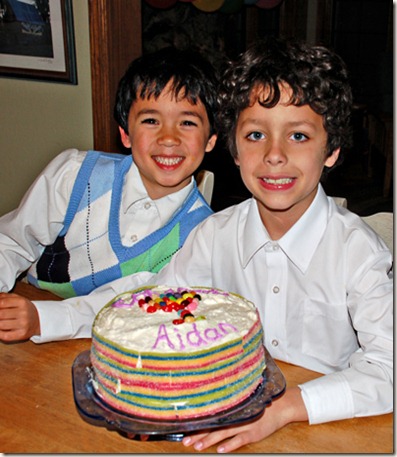
Right up front, please notice I did not say the “Most Beautiful Cake Ever.”  I’m not entirely at fault for the decorating.  Princess Thundercloud insisted on helping, and I was trying to keep the cake a surprise, so was decorating while the other hooligans were watching “Land of the Lost.”  The series, not the remake movie with Will Farrell.  Point being, I had at best thirty minutes to stack, fill, frost, and decorate 6 layers.

Justification over, the cake itself and the frosting were truly the best I’ve ever made.  My GI Joe pronounced it the best he’d ever eaten, anywhere.  He even ate it the next day, which he never does. He’ll eat leftover anything except cake or pie. One slice and he’s done, usually.  This served 7 people, two times. And I think the hubs sneaked a piece for a midnight snack, too.
boys-with-cake
For the cake, I used the Elegant White Cake recipe from The King Arthur Flour’s Baking Companion cookbook, with a couple of small changes.

Elegant White Cake

(adapted slightly from King Arthur Flour)
8 Tbsp unsalted butter, very soft
1/2 cup canola oil
1 Tbsp baking powder
1-3/4 cup granulated sugar
3/4 tsp salt
1 tsp Fiori di Sicilia (or vanilla)
2 tsp almond extract
2 whole eggs
1 egg white
2-3/4 cup cake flour (this is important to success. Don’t use all-purpose)
1 cup milk

1. Preheat oven to 350 degrees.  Grease and flour cake pans and line bottom with parchment paper. For the rainbow cake, I used 6 foil 9" round pans.  You could also use 3 regular round pans, and do two rounds of baking.

2.  In a large mixing bowl, cream together butter, oil, sugar, baking powder, sale, and extracts until light and fluffy.  I did this with a ginormous whisk, but you could also use an electric mixer.  I’m lazy when it comes to doing dishes.

3. Add the eggs and egg white (if you want a truly white cake, use 5 egg whites and no whole eggs).  I was coloring this, so didn’t care if it was not completely white batter.

4. Stir in 1 cup flour, then 1/2 cup milk, then 1 cup flour, then 1/2 cup milk, then remaining flour.  Be sure to scrape the sides and bottom of bowl throughout this process, if you’re using an electric mixer.

5.  IF YOU ARE NOT MAKING A RAINBOW CAKE, pour the batter into the pans at this point.  Bake until center springs back.
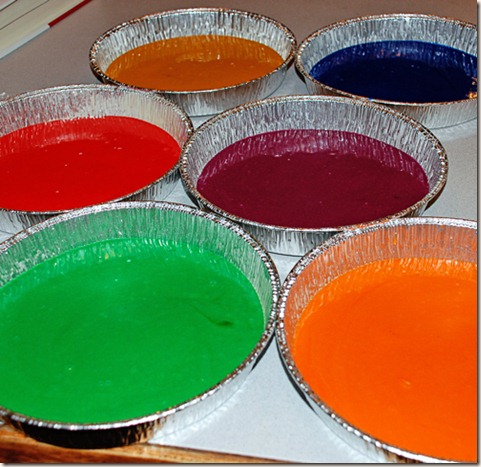
layers6. For the rainbow cake, scoop a scant cup of batter into each of 6 bowls.  Tint them as dark as you would like using gel food colors.  Pour each into a prepared pan and bake for 15-18 minutes, until centers spring back.  Test each layer, as they may not be done at exactly the same time.  he green layer took about 3 minutes longer, for some reason.  I baked 3 layers at a time on a rack in the middle of the oven.

7.  Remover from oven and let cool to room temp.  I froze the layers overnight to make them easier to frost, as well as hide them from the hooligan.

Now for the frosting.  I had read about this various places online, but couldn’t wrap my brain around the possibility of a frosting made with flour and granulated sugar being all that and a bag of chips.  I was tired of buttercream, though, having just made cherry buttercream for the Hello Kitty party a week earlier. It’s delicious, but so rich.  I was worried that having 6 layers filled with it would be just way too much.  So I tried it.

I used this recipe from MissyDew at Tasty Kitchen.  Essentially, you make a roux from milk and flour, then let that cool to room temperature.  Apparently this is a very traditional recipe.  My mom said her grandmother made a similar one, also using granulated sugar. I see this as a life-altering recipe, as I’m often out of powdered sugar and thus don’t make frosting for things.  Perhaps it will be a waist-altering one as well, but I’ll take my chances.

It has the consistency of really thick whipped cream, and that’s what it tastes like, as well.  It spreads beautifully and will hold its shape for piping.  If you get fancy with it, I would keep it refrigerated until a half hour or so before serving.  I didn’t get fancy, but refrigerated it anyway.

Again, I was worried about all that frosting between six layers, so I filled the layers with marshmallow cream.  One small jar was just enough to do 4 layers, then I used the frosting between the top two layers and on the top and sides of the cake.  I had about 1/2 cup of frosting left over, which the hubs unwisely ate out of the bowl. He looked a little green later.

DSC_0079
When you are ready to layer, frost, and decorate, place the first (purple) layer on you cake plate.  Slide strips of wax paper around the sides.  Then, when you’re done frosting, you can pull them out and have a clean cake plate.
top-of-cake
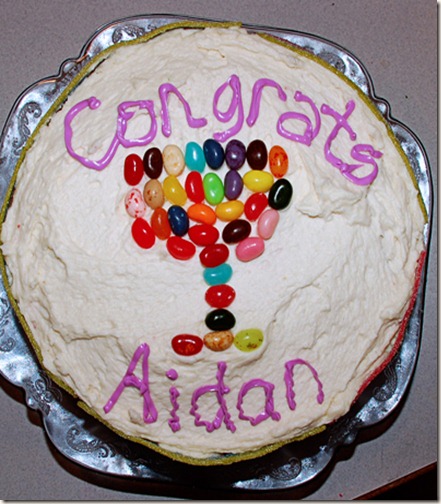
As you can see, my helper was rushing me by the time I got to Aidan’s name, so it’s a little wobbly. He thought I did it on purpose, so I’ll go with that.  His request for a cake was a rainbow cake, white frosting, and jelly beans on top.  This is what I did, after a great suggestion from my sister-in-law for the chalice.
side-of-cake
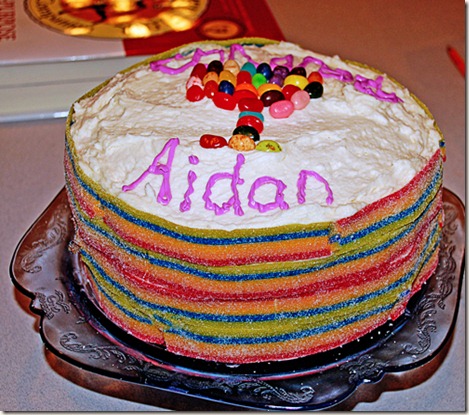
I wrapped the sides in Extreme Sour Rainbow Strips.  I can’t tell you how happy I was that the one package I bought was exactly enough to cover it.  Unfortunately, my helper also put one strip upside down and I didn’t realize it until I was serving it. Oh, well.

cutting-cake
A word of caution if you use the rainbow candy…it’s extremely hard to cut and have the cake remain decorated.  As you can see, the layers worked perfectly and the guest of honor was thrilled. He didn’t realize the inside was going to be rainbow; he thought just the candy on the outside was.  You’d think he had not been my son for his whole life.  He should have known that if I say a rainbow cake, I mean a rainbow cake!

If you have a little rainbow-lover in your life, I definitely recommend making this. It really was not difficult or time consuming.  You could also use 2 white cake mixes, but this cake was divine. So I guess that makes it perfect for a First Communion!  I also like to avoid the partially hydrogenated oil and other additives in cake mixes.  Of course, I had no qualms about dying the cake, but let's ignore that for now.

The frosting took a little time, because I had to wait for the roux to cool.  I followed the tip, though, and cooled it over a bowl of ice water in the sink and it was ready when my butter and sugar were.

It was the perfect ending to his First Communion celebration…and of course, the other two plan to have the same for their First Communions. Fine by me…as long as they have Sleestaks and the Land of the Lost to keep them from “helping” me!


Tuesday, May 1, 2012

Reaching a Milestone

Our eldest made his First Communion this weekend.  Being a convert to Catholicism, I had never even attended a First Communion Mass and really didn’t know what to expect.  It was a beautiful ceremony and the hooligan couldn’t have been less hooligan-like.  So now I can exhale.

This post is mostly for those family and friends who couldn’t make it to the Mass but are still interested.  The rest of you can read and look if you like, but you’re excused if not!

Aidan-Edit
At the “dress rehearsal”

making-banner
Making his banner, another tradition I knew nothing about and had to Google

banner
His finished banner on the end of our assigned pew.  I really wish I could quit thinking of “Steve-O” the B List celebrity every time I see his first name and last initial.

candles
Someone decided to let him carry a lit candle (next to a girl in a veil) at the front of the procession. I blurred everyone else’s face to protect the innocent, by the way.  I don’t have a weirdly focusing camera. This was the only part of the Mass we could photograph, the procession.

boys-with-cake
His little brother’s favorite part…cake!  Come back tomorrow and I’ll share the amazing recipe for both the cake and frosting.  We decided it was the best cake I’ve ever made (or eaten!). Oh, and both boys had on ties for church and took them off for dinner.  We’re not in the habit of making them button their shirts to their chins.

I’ve been so impressed with our son this year.  He’s had Religious Ed classes every Monday night and really enjoyed all that he’s learned.  I was worried about his being able to memorize all the prayers he needed to, but he was done memorizing before Christmas and has said them often since.  Part of his ADHD is that he was unable to memorize things, but with a lot of hard work and the medication he takes, he was able to accomplish it. I think there were seven prayers to memorize, and not being a cradle Catholic, I didn’t even know some of them.

The other two kids are so excited for the First Communions now.  This was such a wonderful experience for all of us, as we navigate our way through parenthood and “raising them right!”

Monday, April 30, 2012

May Day, May Day!

Tomorrow, May 1, is May Day.  Traditionally, people give flowers to neighbors, friends, etc. and dance around the maypole, weaving an amazing ribbon “net” around the pole.  I’ve always thought it would be cool to do this, but having only three kids doesn’t lend itself to that. Not that I want more kids.  So don’t drop yours off at my doorstep.

Maybe someday I’ll figure out how to do it and have a nifty little May Day party, but this year has been too hectic, with Spring Break vacation, a birthday party, and First Communion in the last three weeks.  Then next week is Teacher Appreciation Week, so I’m taking a breather this week! Shameful, I know.

The boys and I did make a cool little craft that I’ve been mulling over for awhile.  Earth Day fell on the same weekend as the birthday party, so we kind of skipped it this year. These plantable wildflower shapes would have worked for it, but they’re also great for May Day or for Teacher Appreciation.

DSC_0069
In hindsight (or for next year), we’ll make them using shredded tissue for a prettier color.  We used shredded newspaper this time, which worked great, but made gray butterflies. They do look very “earth-friendly,” though.

DSC_0107
After running the newspaper through the paper shredder (with adult supervision, of course!), we put a couple of large handfuls in a big plastic bowl and added enough water to really moisten it.  We used almost 2 cups of water for a giant bowl.  By the way, do this in a bowl you’re not attached to…trust me.  Then the boys squished it and squashed it until it was pulp-ish.  At that point, we stirred in some wildflower seeds…a heavy sprinkling.

DSC_0109
We squeezed out most of the water and packed it into a butterfly cookie cutter (also not a family heirloom).  See how nasty that finger looks from the printers’ ink?  I was glad I was taking photos and didn’t have to make my fingers look like that.  Also glad that this hooligan had made his First Communion the day before this craft!

The cookie cutters and bowls are stained quite badly, even after trying Barkeeper’s Friend on them. So you’ve been warned.  The hands were okay after many handwashings and a shower.

DSC_0111
When all the paper was used up, we had 12 shapes, some butterflies (pretty cute) and some tulips (not at all recognizable as such).  We sprinkled more seeds on top and set them in the laundry room to dry.  It takes a couple of days.  You don’t want your paper to be so wet that it takes too long to dry and the seeds begin to sprout.

tin-outside
After they dried, we put them in tins (from the craft store) as seen in the first photo.  We embellished the lid with a label I made in Photoshop and some bakers’ twine. Oh, and I glued the instructions for the seed pods inside the lid.  All the recipients have to do is dig a shallow hole, drop in a pod, and cover with about 1/4” of dirt.  Or they can break the pod apart and scatter it. The newspaper does provide a bit of fertilizer, according the info I read online. No, not on Wikipedia.

The boys really enjoyed this and are pretty proud that they made gifts for their teachers.  It wasn’t messy to clean up, either!

Happy May Day…perhaps you could celebrate by buying a neighbor (or yourself!) some flowers!

By the way, I'm linking this over at Skip to My Lou for Made by You Monday,  if you'd like to check out it and other amazing ideas!

Friday, April 27, 2012

Hot off the Presses!

Stampin’ Up! released the list of retiring accessories and supplies yesterday.  It’s pretty massive…12 pages…and very fluid.  When an item is sold out, it’s gone forever. You can see the complete list at my website, and if you see some things you need (or want) be sure to order them right then and there.

If you take a look at the list, you’ll see all the classic and craft pads are retiring.  Don’t panic. Starting on June 1 with the new catalog, Stampin’ Up! pads will have a “firm foam” pad rather than the fabric ones we currently have.  They hold the ink better, ink the stamps better, and have better results all around. If you have the current stamp pads, you don’t need to replace them.  Refills will work on either type of pad.

Craft ink pads will only be available in Basic Black and Whisper White.  Most markers will only be available in sets, so if you need individual ones, get them now. As expected, almost all the Designer Series Papers are retiring, and anything involving the 2010-2012 In Colors:  Poppy Parade, Pear Pizzazz, Concord Crush, Blushing Bride, and Peach Parfait.  That’s inks, papers, ribbons, embellishments, whatever.

12x12 Textured Cardstock is retiring, as well as many colors of 12x12 Smooth Cardstock. So please take a few (or many) minutes to look over the list.  So many things are retiring as Stampin’ Up! redesigns the catalog.  I can’t wait to see the new, amazing products!

The cards I want to show you today actually do not involve many retiring products, at least not in the essential design.

DSC_0021
Supplies:  Hello Friend Stamp Set
Pink Pirouette and Very Vanilla Cardstock; First Edition Specialty DSP
Chantilly Trim (retiring); Vintage Trinkets; Corner Rounder punch
Concord Crush (retiring), Soft Suede, and Melon Mambo Classic Ink

To make the background piece, I stamped the flower image using Concord Crush, then crinkled it and flattened it a bunch.  Finally, I lightly rubbed over it with the Soft Suede ink pad. 

DSC_0068-1
Supplies:  Happy Greetings stamp set (way retired)
Crumb Cake, Soft Suede, and Very Vanilla cardstock; First Edition Specialty DSP
Baja Breeze and Soft Suede Markers; Baja Breeze Seam Binding; 
Spiral Border (way retired), Large Oval, Scalloped Oval, and Scallop Circle punches
Elegant Lines Embossing Folder and Big Shot; Antique Brads

I love the way the Elegant Lines Embossing Folder pumps up the interest on the newsprint. To make the flower, I cut 5 scallop circles, folded four of them twice, and attached them to the last one.  To finish the flower, I put an antique brad in the center and spinged the edges with Baja Breeze.

I really miss the spiral border punch that retired last year.  Or maybe the year before.  You can still buy them at craft stores, though, made by EK Success.

I’m so glad the First Edition DSP isn’t retiring.  It’s great for vintage or grunge projects, as well as adding interesting pattern to contemporary cards. Really.  I’m not making that up to sound all creative.

Thursday, April 26, 2012

Pie Time!

My life has been lacking in pie lately.  I’m pretty sure if I eat enough pie, I could solve all the problems of the world.  Or maybe world leaders need more pie.  Anyway, on with the post.

Our house in Washington has tons of wild huckleberry bushes in the yard.  Did you even know huckleberries were a real berry?  They are, and they are delicious, if a bit tart.  The wild ones are tiny, and it takes forever and a day to pick enough to do anything with…but it’s great entertainment for the little ones.

DSC_0039We were fortunate enough to have neighbors who gave us huckleberries they had picked (thanks, Mr. Tom!), so we didn’t have to rely on the foraging skills of preschoolers.  As you can see, he was willing to pick, but ate more than went in the bowl!

I made up this pie last year using huckleberries, based on a raspberry cream cheese pie that our favorite sandwich shop in Washington features.  If you’re in the neighborhood, 5th Avenue Sandwich Shop in Olympia is definitely worth a try!  Until then, here’s my huckleberry pie, changed back to use raspberries because there are no huckleberries (or neighbors to pick them!) here in Wisconsin.

DSC_0079

Raspberry Cream Cheese Pie

1 pie shell, baked
Raspberry filling:
12 oz bag frozen raspberries, thawed but not drained
1/2 cup sugar
2 Tbsp cornstarch
2 tsp butter
Cream Cheese filling:
8 oz. cream cheese (light or regular will work), very soft
3/4 cup confectioners’ sugar
1 tsp almond extract (or vanilla, but I like almond better)
1 cup whipped cream (or you can use thawed Cool Whip)

DSC_0071
1. To make filling:  Whisk together cornstarch and sugar (this keeps lumps out of your filling) in a medium saucepan.  Add raspberries with their juice and whisk over medium heat until thickened and bubbly.  Cook one minute after it bubbles (this sets the cornstarch and makes your filling nice and shiny).  Remove from heat, stir in butter, and let cool.

DSC_0075
2. To make cream cheese layer:  Cream together cream cheese and confectioners’ sugar.  Stir in almond extract, then fold in whipped cream.   Spread in cooled crust.

3.  Chill at this point for about half an hour, then spread cooled raspberry filling on top.

4.  Chill until serving. Top with additional whipped cream if you’d like.  And who wouldn’t?

DSC_0082
If you’re lucky enough to have them, you can make this with huckleberries by substituting 2 cups fresh or frozen berries and 1/2 cup water for the raspberries and juice.

This pie is light, not too sweet, and utterly delicious.  I hope you try it!