My blog has moved!

BREAKING NEWS!!!!
My blog has moved...Please visit me over at my new blog home:
http://www.chaosserveddaily.com/

You can sign up to follow via email or other paths there, and, if you do, please leave me a comment so I can thank you...and follow you back, if you'd like! Hope to see you there!

Wednesday, June 20, 2012

So This Margarita Walks Into a Bar…

…and makes a really yummy, cool and creamy treat, even without the tequila.

I recently hosted book club and made some delicious Strawberry Margarita Bars to serve as dessert.  Then we started drinking real margaritas and eating chips and salsa and I completely forgot to serve it. The family has enjoyed it for dessert, though!

This is my favorite kind of dessert for summer: No baking, very little prep time, and light in taste and calories.

straw-marg-bars

Strawberry Margarita Bars

1-1/2 cups crushed pretzels
1/3 cup butter or margarine, melted
1/4 cup sugar
1 can (14 oz.) fat free sweetened condensed milk
1 cup pureed strawberries
1/2 cup lime juice(I used bottled)
1 tub (8 oz.) Cool Whip Free, thawed
1 cup sliced fresh strawberries

1. Mix pretzel crumbs, sugar, and butter in 13x9-inch pan; press onto bottom of pan. Refrigerate until ready to use.
2. Combine condensed milk, pureed strawberries and lime juice in large bowl. Gently stir in COOL WHIP; pour over crust.
3. Freeze at least 6 hours. Remove from freezer about 15 min. before serving; let stand at room temperature to soften slightly. Serve topped with sliced strawberries.

How easy it that, I ask you?  Enjoy!

Click here for a printable version


Sharing this over at 


and The Taylor House

Tuesday, June 19, 2012

Pinwheels!

I recently discovered the secret of everyone getting along in the car…kid books on CD.  I know, I’m late figuring this out, but I didn’t think they would listen, since they don’t listen to me or each other in the car.  It’s amazing how captivated they are! 

So what’s the connection with pinwheels?  I’m glad you asked. We were listening to a Nate the Great book and at the end are all sorts of nifty little crafts and information.  One segment described how to make a pinwheel, and it sounded super easy. And it was!

Once I made one, I couldn’t stop.  The kids even made them.  That’s how easy peasy lemon squeezy they are. Yes, I need to stop listening to kids’ books.


pinwheels
I used Stampin’ Up! cardstock to make this decoration for the front door.  It was, frankly, a bit too thick to bend without creasing.  For the sticks, I wrapped that cool paper tape from Target around dowel rods, then wrapped red and white bakers’ twine around that. To make them lay flat against the door, I tied monofilament line from each stick to a metal clip in the center, above the white pinwheel.  See it?  That’s also how I hung it on the door.

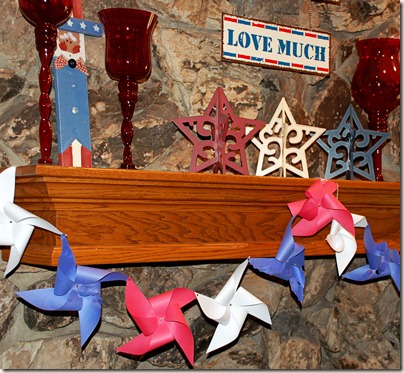
Then I wanted to make a garland for the mantel, so I raided the kids’ stash of construction paper.  I don’t think these will last through storing them, so it’s not important that they be colorfast.  I thought it was for the ones on the front door, since the sun would fade the construction paper in about 2 seconds.
0712-Mantel

pinwheel-garland
How do you make them, you ask?  (Aren’t you just full of questions today?) Here’s how:
DSC_0001
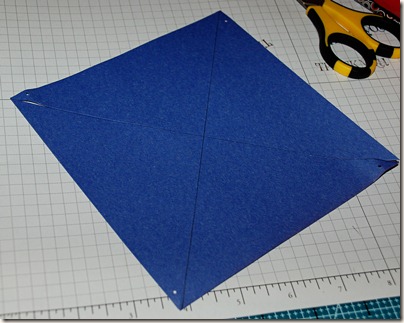
Cut your paper to a square.  The ones on my door are 8-1/2” squares, the garland is 6” square.  Draw diagonally from corner to corner, making an “x".”  Cut from the corners to about 1” from the center.  Punch a small hole (I used a 1/16” punch because I was using tiny brads) in the upper leftr corner, then the next left corner and so on. Also punch a hole in the center.
pinwheel-assembly
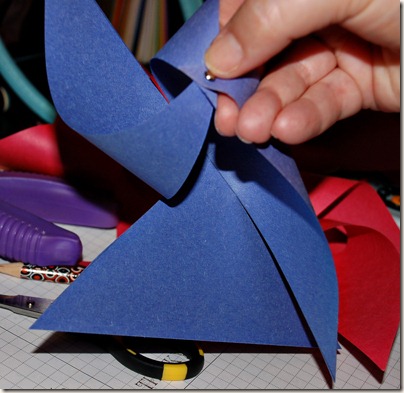
Push a brad through from the back of one corner.  Work your way around, tucking each corner under the brad so that the brad goes from back to front. 

DSC_0005
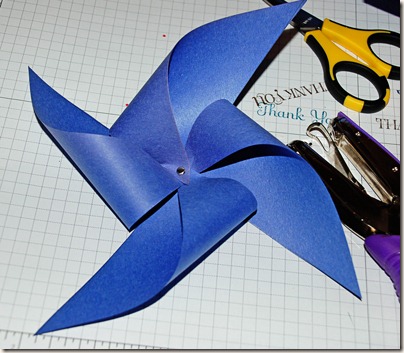
When all four corners are on the brad, push it through the center and open the prongs to hold it.
finished-pinwheel
To make the garland, I punched holes in two adjacent spokes and used brads to hook one to the next.
You could also put a cute stamped or printed circle image in the center, to cover your brad.

Please don't burst my little bubble of happiness and tell me I'm the last person in the world to learn to make these.  Even if it's probably true.

While these aren’t true pinwheels that will spin in the wind, they’re a fun, summery, inexpensive way to brighten up your décor!

Monday, June 18, 2012

Yay for Daddy-O!

DSC_0038What a fun Fathers’ Day weekend we had…I mean, the Big Daddy-O had!  And you know what that means…my post today will be a photo one, so our family can check it out.  I’ll post something crafty or tasty tomorrow…I promise.

IMG_0328
On Saturday, we went to the Lego Kidsfest in Milwaukee.  Sorry for the blurry photos…I only had my phone with me, since I needed my hands free to build!  Not really, but I didn’t want to take another camera along.  This Lightning McQueen model was pretty amazing…I think the Master Builder told the hubs it took 4 weeks and something like 600 man hours to build.

IMG_0329
We spent a lot of time at the Race Ramps, building and re-engineering for speed. This one was not speedy, but that blade on the front of it proved lethal to a couple of other racers.

IMG_0313
Princess Thundercloud and I were totally absorbed by the new line of Lego Friends.  They’ve designed quite the intricate backstory on these girls, as we learned in the story book we bought.  These Legos involve lots of pets, shopping, and dessert baking.  What’s not to love?

DSC_0027
Sunday was a pretty laid back day.  We went out for breakfast, then ran a couple of errands (to Home Depot, of course).  My GI Joe worked on the yard for several hours, which gave the kids time to make this Cookies and Cream Fudge Rockpile.  It actually looked a lot more rockpile-ish than this, but we forgot to take a photo before devouring half of it.

If you’d like to make your own fudge rocks (or whatever shape.  It molds perfectly without being sticky.), here’s how.

Cookies and Cream Moldable Fudge

 24 oz white candy coating(white chocolate won’t melt correctly)
1 can (14 oz) sweetened condensed milk (we used fat free, but any will work)
3/4 cup finely crushed Oreos

1. Place the white candy coating in a large microwavable bowl and melt, according to package instructions. When it’s melted, stir in sweetened condensed milk until smooth.  You may need to heat it another 20 or 30 seconds.
2. Stir in cookie crumbs and let sit at room temperature for about an hour, until it’s cool and no longer sticky.  I speeded this process up by refrigerating it for about 15 minutes.  Don’t let it cool completely in the frig, though, or it may develop condensation and ruin the consistency.
3. Then you just make it into a rock shape or whatever.  It’s actually quite tasty, as well as easy.

Now it’s on to planning the next festivities…we love Independence Day!

Friday, June 15, 2012

Dining Al Fresco

One of my favorite things about summer is having dinner on the deck, especially when it’s a meal we cook on the grill.One problem, though, is all the trips in and out of the house bringing utensils and such.  I swear the bugs just congregate, hovering by the screen, for the second it’s open and their chance to dart inside.

So I was thrilled to see that Walmart had their wire jar caddies back in stock last week…and they were on clearance, which is a little worrisome, since I want them to be there when I want them! 

0612-CaddyAnyway, I bought a couple and used one to make this cute, functional caddy to take out the flatware, napkins, and placemats in one trip.  I also added a jar of candies, just to balance out the weight, but that could be replaced with condiments if I needed them.

Last weekend, we had an almost perfect summer meal (it was missing homegrown tomatoes).  I managed to snag the last package of Copper River salmon at Costco, and we had corn on the cob and baked beans alongside.

When we lived in Washington state, it was headline news when the Copper River salmon catch first arrived at the airport.  It’s supposedly the best salmon around (apologies to Alaskans), or at least the best available in the lower 48, and can only be found for a few short weeks in June.

Here’s how I grilled it:

I sprayed a double layer of foil with cooking spray, then placed the salmon in the middle of it and squeezed a lemon over it.  I mixed this rub:

  • 2 tablespoons brown sugar
  • 4 teaspoons chili powder
  • 2 teaspoons grated lemon rind
  • 3/4 teaspoon ground cumin
  • 1/2 teaspoon salt
  • 1/4 teaspoon ground cinnamon
  • …and rubbed it on the top of the salmon.  I sealed up the foil and grilled the packet for about 10 minutes on the top rack of our grill.  The corn, wrapped in foil, was grilling on the bottom rack for about 20 minutes, turning it every 5 minutes. The baked beans, alas, were Bush’s Vegetarian and I just heated them on the stove…but I could have used the grill for that, too!

    Have a great weekend, and I hope you are having weather perfect for al fresco dining! (If that’s what you choose to do, of course!)

    Thursday, June 14, 2012

    Not Too Shabby for 237 Years

    A question for all you non-Army types out there…what significance does June 14 have?  Flag Day?  Yes, that is correct, but more importantly (in our household’s opinion), it’s the Army’s birthday! And how do we celebrate every occasion, big or small?  With thematically appropriate food!

    0612-Flagg-Cake
    Ta-da!  I hope you’re more impressed with this than my hooligans were.  They just went, “Oh, that’s cool.” Not even with an exclamation point in their little hooligan voices.

    DSC_0003
    DSC_0013
    So here’s what I did, for you eagle-eyes who noticed that the cut slice is not decorated with writing and blueberries…I’m sending this in with my GI tomorrow, but I wanted to brag  show you how cool it was.  So I took the photos, put the slice back in, and frosted over it.  Then I decorated with icing and blueberries.

    Hidden Flag Torte Cake

    I read her directions a couple of weeks ago and obviously didn’t follow them to the letter.  I made mine the same way I made the rainbow cake for First Communion.  I used 8” pans with a 5” pan in the middle of two of them for the blue.  You’ll see what I mean if you read Kimmi’s instructions.

    DSC_0008-1
    I also made a batch of these stamped almond butter cookies. 

    DSC_0015
    I bought this set of cookie cutters at Williams Sonoma last fall, and then I forgot I had them.  I was digging around in the corner cabinet for my small springform pans to use for the cake and found them.  They worked wonderfully.  I followed the recipe included, except that I used almond extract instead of vanilla.

    DSC_0002-2
    DSC_0009-1
    I had planned to write U.S. Army under the Happy Birthday on each one, but my family decided they wanted to eat dinner tonight so I had to content myself with some festive dots that took less time.

    You can always celebrate further by belting out the Army’s song, “The Army Goes Rolling Along.”  Here’s the version we favor, since we’re a Field Artilleryman’s family:
    Over hill, over dale,
    We will hit the dusty trail,
    And those Caissons go rolling along.
    Up and down, in and out,
    Counter march and left about,
    And those Caissons go rolling along,
    For it's "hie-hie-hee",
    In the Field Artillery,
    Shout out your numbers loud and strong,
    For wher-e'er we go,
    You will always know,
    That those Caissons go rolling along.
    You can find the “official” version by Googling, but the original was written by a young field artillery officer, so we like to stay true to tradition! Hooah!

    Linking up at The Taylor House

    Wednesday, June 13, 2012

    Much Cleaner Than Their Actual Handprints

    For Fathers’ Day, I wanted to make gifts that were similar to the fingerprint trees I made the grandmothers for Mothers’ Day, but more masculine.  I had seen an idea on Pinterest with handprints cut out of scrapbook paper, then Princess Thundercloud brought home a version for her daddy with her handprints in paint.

    I decided to make ours incorporating a photo of each hooligan.

    Dads-Day
    I made this much more complicated than I needed to, in retrospect.  I traced each of their hands on white paper and scanned it into the computer.  Then, using Photoshop, I deleted everything but the outline of their hand and pasted it on top of their photo. It would have worked to just print out a photo the approximate length of their hand, then traced their hand directly onto the photo and cut it out. Crafting is a process, right?

    While I was doing the photo piece, the boys painted 11x14 flat canvases with some light turquoise paint.  They’re already primed, so it only took one coat to cover.  They were 3 for about $6 at Michael’s, I think. And I had a 40% off coupon, so dirt cheap.

    After I printed the photos on matte presentation paper (not photo paper) and cut the hands out, I used matte Mod Podge to adhere them to the completely dry canvas and let it dry.  Next, I brushed a coat of Mod Podge over the whole thing, using a 2” brush with bristles (instead of my usual foam choice) and brushing first one way then perpendicular.  It gives the look of canvas on the whole thing.

    Lastly, I used a Sharpie to write the message.  The hooligans signed the back.

    DSC_0002-1
    I was planning to give the grandpas an easel with theirs, but decided I’d rather use a ribbon to hang them and finish them off.  My Crop-a-dile easily punched through the canvas, then I knotted the ends of a wide piece of ribbon on the back side of each hole.

    The hooligans also helped me make some “Chubby Hubby” bars to send their papas.  The kids thought they were excellent…I thought they were a bit bland.  Maybe it was too many flavors or not enough of each…they were basically Toll House cookie dough with some peanut butter and crushed pretzels stirred in, spread in a 9x13 pan, then topped with more crushed pretzels, PB chips, and chocolate chips.

    If you’d like to try them, you can find the recipe here, at Food.com.  Since those are all of our favorite foods, I’ll try them again, bumping up the flavors a bit more.

    Hope you have a “hand-y” day!

    By the way, I'm sharing this over at The Taylor House

    Tuesday, June 12, 2012

    Feeling Bright and Colorful

    LiliesAren’t these gorgeous lilies?  My middle hooligan found these and insisted I see them immediately, and take a photo, of course.

    Their color inspired me to make a couple of cards using the new Stampin’ Up! Floral District Designer Series Paper. I am a collector of DSP and have to be really motivated to turn loose of any of it and use it on a card.  But then I always think, DSP makes it so easy to make a card…I should use it on every one!

    0612-Birthday-Poppies

    I embossed the DSP using the Fancy Fan folder for a little texture.  The sentiment is from the A Word for You stamp set, punched out with the Modern Label Punch and a circle of Calypso Coral behind it, to echo the circles on the DSP.The background is also from the Floral District DSP set.

    DSC_0001

    The patterned strips of paper on this are the reverse side of the Lucky Limeade Poppy DSP from Floral District.  To make the rosette, I cut a strip of DSP 1-1/2” x 12” and used the scallop border punch on it.  Then I scored it every 1/4” using my Simply Scored board and joined the ends, adhering the whole thing to a circle of paper behind it. This sentiment is also from A Word for You.

    On both cards, I used my 1-1/4” circle punch to round one corner.  To do this, just slip the corner you want rounded in through the bottom of the punch between the blades, then punch it.

    Now I’ve got to finish Fathers’ Day gifts so I can mail them tomorrow…I’ll be sharing those tomorrow, if you’re interested!