My blog has moved!

BREAKING NEWS!!!!
My blog has moved...Please visit me over at my new blog home:
http://www.chaosserveddaily.com/

You can sign up to follow via email or other paths there, and, if you do, please leave me a comment so I can thank you...and follow you back, if you'd like! Hope to see you there!

Thursday, August 9, 2012

Storytime Suite

Did you know Stampin’ Up! designs product suites, with coordinating stamp sets, designer papers, embellishments, and even dies?  Well, they do!  How thoughtful are they? And remember, you can shop 24/7 on my website...just click that button in the right sidebar! I'm thoughtful, too.

One of my favorites in the 2012-13 Annual Catalog, the Storytime Product Suite features vintage style school sketches and colors I love together:  Pool Party. Basic Gray, So Saffron, Ridinghood Red, Wild Wasabi, and Pumpkin Pie, along with several others.

Today, as I contemplated (with a large amount of glee, I admit) the fact that school starts in 27 days, I pulled out these products to design a few back-to-school projects.  The suite helps everything come together “speedy-quick,” as Junie B. Jones would say.  I’m sending the cards in back to school packages…I just can’t decide if the sentiments are more appropriate for the kids or their moms!

0812-Yippee-School
Stampin’ Up! Supplies:  Storybook Friends stamp set
Storytime DSP; Whisper White, So Saffron, and Basic Black Cardstock
Stazon Jet Black ink; Soft Suede, Ridinghood Red, and Pool Party Classic Inks
Label Collection Framelits; Aquapainter;  Wooden Skewer (not from SU!)
Daffodil Delight, Basic Black, and Real Red 1/8” Taffeta Ribbon

DSC_0002
Stampin’ Up! supplies:  Storybrook Friends stamp set
Storytime DSP; Basic Black, Very Vanilla, and Pool Party Cardstock
Stazon Jet Black ink; Black Embossing Powder; RIdinghood Red, Wild Wasabi, and Pool Party Classic Ink
Label Collection and Apothecary Accents Framelits; 1/8” hole punch; Cherry Cobbler Bakers’ Twine

I’ve been wanting to try this splattered watercolor technique.  To do it, dip a paintbrush in a bit of ink, then in water, then tap the brush to make the splotches.  I practiced a few times on scrap paper, and I really like the interest it adds to the card.

DSC_0009
Stampin’ Up! supplies:  Storybrook Friends stamp set; Storytime DSP; Basic Black Cardstock; Whisper White Craft Ink; White Embossing Powder; 1/8” hole punch; Cherry Cobbler Bakers’ Twine; Ticket Corner punch (retired); Red Polka Dot Ribbon (retired); Silver Eyelet        From craft store:  Clear paint bucket (in packaging/gift wrap section)

I love the border prints that are almost always included in the DSP collections.  Unfortunately, since I don’t make paper scrapbook pages any longer (I'm all digital, baby!), I sometimes struggle to use them.  This kid parade print was so adorable, I HAD to use it.  It makes a great teacher gift for the first day of school. 

I just cut a piece of the paper 5-3/4” tall, leaving it 12” long.  I rolled it into a tube and pressed it into the inside of the can.  It fit exactly, and took all of 30 seconds to make. It took seven dozen pencils to fill it, if you’re interested.

I’m pretty sure the teachers are not thinking “Hooray!” but too bad for them.  I certainly am!  Now if I could just find a Big Chief tablet to satisfy the nostalgic longing induced by using these stamps and papers!

Wednesday, August 8, 2012

Shazaam! Desk Redo

Just before school was out for the summer, the boys’ school had a few old desktops for sale at very reasonable prices, so I bought one.  Keyboarding is a challenge for our oldest, and I certainly am not crazy about letting him practice on my laptop or desktop. 

With this used computer, he can play practice games as well as games on CD.  He will not be able to access the internet, much to his chagrin.  Our internet here is a wireless card, where we pay by the usage for date.  Ack.  You can imagine how Lego and Netflix downloads would suck that up, if I didn’t have control over it!

But we needed a desk to put said computer on in his room.  We visited the local thrift shop back in June and found one that was perfect for our needs.  Sturdy and cheap. And not too large.  He picked paint colors (with a little guidance from the Stampin’ Up! Color Coach) and we bought sample sizes of a pale turquoise and a schoolhouse red. We also bought a craft size bottle of chalkboard paint for the top and new drawer pulls.

DSC_0016
After we tried to give our kids e coli Sunday, I came home ready for a project.  We finally started on this one, and it went very quickly.

DSC_0018
We painted it Sunday evening.  The hooligan got to help, since it’s for his room. Sadly, the only paintbrushes we could find were little sponge ones that I got 20 for $1 at Joanns.  But they worked fine.

DSC_0002-1
Monday night, my GI Joe drilled some new holes for the top drawer handle, and we replaced the hardware.  Then an extra coat of the blackboard paint, just to make it thicker on top, and we were done.

I think it turned out wonderfully, especially since we spent less than $40 total for the desk and the supplies.  The drawer pulls cost more than the desk, by the way.

It reminded me of how much I enjoy refurbishing furniture…maybe I’ll add that to my list of things to fill my spare time!

Tuesday, August 7, 2012

Why I Didn’t Craft Today

So I didn’t get any crafting done today.  Why?  Well, I was busy being Mom’s Taxi Service, with kids at three different camps in two locations 20 miles apart. Sounds like fun, huh?  But it was only for today, not the whole week. Consequently, I am forcing you to see what we did Sunday to liven up our lives.

e--coli-beach
First, we went to our favorite Lake Michigan beach.  After ninety minutes of playing in the sand and splashing in the water, a lady out for a walk asked if we saw the “no swimming” sign.  Apparently there’s e coli in the water. We came home and scrubbed everyone, practically turning them inside out, and are hoping for the best. We rock this parenting thing.

In our defense, there was one small sign posted under the regular one that says no lifeguard on duty, no fires, etc.  It was red and said STOP in bold letters, but none of us even glanced that way as we headed down the trail to the beach. Oh, well.

DSC_0012
See how (relatively) clean and shiny they look?  They inhaled some pushups on the front porch while discussing the various bugs and butterflies they could see from there. It was actually a peaceful ten minutes. Look how dry their little legs are from the showers…we used about a quart of lotion on them before bed.

DSC_0010
And my GI Joe missed the peace because he was mowing the yard, which has made a heroic comeback from the drought.  We didn’t water this part a bit, and it grew so much the deer were out there grazing as if it were a meadow Saturday morning.
DSC_0004
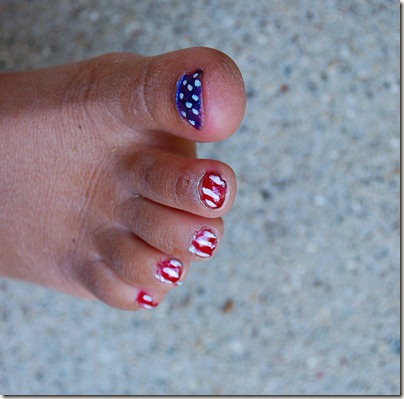
Oh, and I painted Princess Thundercloud’s toenails to match mine, in honor of the Olympics.  It’s hard to paint stripes on constantly moving toes, so don’t judge me.

Then I made an amazing, less-than-thirty minute meal with some Apple Gouda Chicken Sausage that wound up in my cart at Costco last week.  Those sample ladies know what they’re doing when they offer it to the kids! Then they pester me until I at least read the label.  These are actually pretty healthy, with no nitrites and all natural ingredients, as well as being fairly low in fat and high in protein.

Anyway, here’s the recipe I found and tried.  It was delicious enough that all three kids and the hubs stressed that they really liked it and would like it another time. They know if they don’t, we’ll probably never see that recipe again.

Chicken Sausage with Couscous

*Note: I like to use Trader Joe's whole wheat couscous. When I cook it, I use chicken broth instead of water to give it a boost in flavor.
*Serves 4-6
1/3 cup pine nuts
1/2 yellow onion, sliced into thin half moons
1 tablespoon extra virgin olive oil
12 ounces precooked sweet apple chicken sausages, or other type sausage/kielbasa, cut in 1/4-inch rounds
1/2 teaspoon salt
1/2 teaspoon pepper
1/2 teaspoon dried thyme
1/2 teaspoon cumin
1/2 teaspoon coriander
1/2 teaspoon curry powder
1 cup low-sodium chicken broth, divided
1/3 cup dried cranberries
1 cup dry whole wheat couscous

Start the couscous cooking according to the package directions. I like to cook the couscous in chicken broth to give it a boost in flavor.

Meanwhile, in a large non-stick skillet (12-inch), toast the pine nuts over medium-low to medium heat, tossing frequently, until they are golden. Remove the pine nuts to a small bowl and return the skillet to medium heat.

Heat the olive oil until rippling and hot. Add the onions and cook, stirring occasionally, until they begin to turn translucent, about 4 minutes. Add the chicken sausage and brown lightly, about 2-3 minutes. Add 1/3 cup of the chicken broth to the skillet with the salt, pepper, thyme, cumin, coriander and curry powder. Stir to combine and bring the mixture to a simmer. Cook until the onion is very tender and most of the liquid has evaporated and/or absorbed. It should still be slightly wet but not soupy.

Add the cranberries and the remaining chicken broth (2/3 cup) to the skillet. Simmer for 2-3 minutes until the cranberries are heated through and softened a bit. Stir in the cooked couscous and let the entire mixture simmer for 2-3 minutes until the liquid is mostly absorbed but the couscous is not dry. It should still have some tender moisture to it but not be saturated with broth.

Stir in the toasted pine nuts and serve immediately.

It’s from Mel's Cafe Kitchen.  You can find the printable there.  I doubled all the spices, except salt and pepper, and diced my onion instead of slicing it.  It sounds like a lot of ingredients, but it really was very quick and easy to make, 

So your takeaways from this post:
1. Read the signs at the beach and don’t be bad parents like us.
2. The chemicals in pushups will probably kill any bacteria that the scrubbing didn’t.
3. You, too, can have patriotic toes!
4.  This recipe really is a keeper…it was light enough for a summer dish, but the flavors would be fabulous in the fall, as well. From Googling recipes to serving it up, it took less than thirty minutes.


Monday, August 6, 2012

Fake Out Watermelon

I’ve seen all these different fruits scooped out, then filled with Jello Jigglers, then sliced to look like regular fruit on….drumroll….Pinterest!  I had resisted making them because I can’t stand the thought of real Jello, all full of artificial flavors, colors, and sugar or sugar substitutes, which I think are even worse than the real thing. Now I’ll get off my soapbox.

I occasionally make Jigglers (because I can’t resist the molds they sometimes have at the grocery store) but I use plain gelatin and fruit juice.  I made Phineas and Ferb ones that way last week.  See, I’m not horribly depriving my hooligans.

DSC_0004
So I decided to make watermelon fakeouts, using some form of red juice.  In hindsight, I should have tried the watermelon juice, making it myself, but I didn’t. I searched and searched for a juice that was all juice and didn’t contain cochineal (the red coloring made from ground up insect wings and shells).  I know, we’ve been consuming it for years, but now that labeling is required, I’m totally grossed out by it. And now I'm climbing off that soapbox, as well.

Finally, I found Hibiscus Cranberry Juice at Trader Joe’s with an ingredient list that didn’t make me cringe too much. While they were distracted by harassing their father when he got home last night, I finally found alone time to make these.
 DSC_0004-1
This one said how cool it was and praised my talent, and the other two didn’t, so he got to be in the blog post. So there.  They all thought it was tasty, but the others apparently expect that kind of stuff from me.

To make this, wash a small watermelon with soap and water and cut it in half.  Scoop all the flesh out of one half.  Try to get all the red stuff.  Then rinse it out and dry it as best you can.  Fill it with water, to about 1/2” from the top, then pour the water into a large measuring cup to figure out how much gelatin you’ll need.  I only needed 3 cups for my watermelon, so I made the following recipe (from the box of Knox gelatin).

Fruit Juice Knox Blox

Ingredients
    • 4 envelopes knox unflavored gelatin
    • 1 cup cold fruit juice
    • 3 cups fruit juice, heated to boiling
    • 2 tablespoons sugar (optional) or 2 tablespoons honey (optional)
Directions
  1. Sprinkle gelatin over cold juice in large bowl. Let stand one minute.
  2. Add hot juice and stir until gelatin completely dissolves, about 5 minutes.
  3. Stir in sugar or honey if desired.
  4. Pour into 13x9x2 inch pan.
  5. Refrigerate until firm, about 3 hours.
  6. Cut into 1 inch squares and serve.
Here's an online version from Food.com
DSC_0002Obviously, when I got to step 4, I poured it into my watermelon half.  I balanced the rind snugly in a plastic bowl to hold it level. Also, I did not add any sugar or honey. After chilling overnight, I sliced it up and fed it to my kids!

By the way, I didn't actually read the whole recipe, just the ingredients, so I added the gelatin and cold juice to the boiling juice at the same time and stirred until it dissolved.  It worked fine, and I had one less bowl to wash.

They spent most of dessert time discussing what other fruits I could do this to...perhaps they need to help out a little on the execution sometimes!

Friday, August 3, 2012

Girly-Girling It Up

Princess Thundercloud is like a giraffe…she has long, skinny legs and so even her brother’s size 5 jeans are too short.  She just turned four a couple of months ago. Anyhoo, they were perfectly good pants, but I cut about 6” off and made her some pink-polka-dot ruffled capris.  I’m sure by next summer they’ll be shorts, but that’s okay.  I had to cinch them up so much with the waist adjuster buttons that it’s like they’re ruffled at the top, too.

Polka-Dot-Capris
She thinks she’s pretty much da bomb. Some days she is.  Anyway, here’s what you’ll need:

DSC_0006
A pair of jeans and some already ruffled ribbon trim (I found this at Hobby Lobby).  You’ll need about a yard, or four times the width of the jean leg where you cut it, plus about 6 inches.

Ruffled-Capris
First hem the jeans about 1/4” in, then sew the ruffle right along the bottom edge. You’ll then have a double row of stitching.  I use rainbow thread for pretty much everything I make the Princess, just because she likes it.

DSC_0010
As a finishing touch, I sewed a 3” piece of the ruffled ribbon trim into a circle.

rosette
Then I sewed a button (yes, from Stampin’ Up!) into the center to make a flower.  It also covers up that lovely handstitching I did, which is a good thing.

I love being able to recycle the boys’ clothes for her…it’s my little bit to save the planet (and my wallet, too!).  This project cost less than $3, since I just needed to buy the trim and use two buttons from my stash.

That’s another good thing, since I’m pretty sure keeping Princess Thundercloud in hair products is gonna break us.

Thursday, August 2, 2012

Longing for Fall

I just can’t get away from these amazing autumnal colors when I sit down to design something. So sue me.  They do make some awfully cute cards, I think!

DSC_0003
All Stampin’ Up supplies:  Seasonal Sayings stamp set; Very Vanilla Cardstock; 
Orchard Harvest DSP; Lucky Limeade, Island Indigo, More Mustard, and Cajun Craze markers
Jumbo Sticky Rounds; Designer Ribbon Slides; Island Indigo Ruffled Ribbon; 1” Square Punch

Glue-Dot-Rosette
To make this snazzy ribbon flower, I used the new Jumbo Sticky Rounds from the Holiday Catalog.  They’re a 2-1/2” diameter circle of adhesive, just like Sticky Strip and come a dozen to a package for $4.95. All I did was cut a piece of ribbon and wrap it in a spiral, twisting as I worked my way out from the center. Then I slid another piece of ribbon through the ribbon slide and adhered it using Crystal Effects.  I didn’t need the whole diameter of stickiness, so I just trimmed off the extra.

Oh, and I used some twine from the kitchen to match the Very Vanilla cardstock. Sorry, Stampin’ Up! At least it’s not from another craft supplier.  To make the little pennants, I just cut my DSP into 2” x 1/2” strips, inserted one end diagonally into the square punch, and Bob’s your uncle. Of course, you can just snip them with scissors, but why not use a punch at every opportunity?

The Holiday Catalog went live today, so you can see all the goodies on my Stampin' Up! website, and even shop 24/7. Yahoo for the internet!

Wednesday, August 1, 2012

Peach Cherry Freezer Jam

We love strawberry freezer jam around here.  I like making it because it’s so quick and involves very little cooking, unlike the canning I remember doing with my mom many years ago.  My mom always scoffed at freezer jam as not being “real” jam, but I’ll take the tradeoff to keep the kitchen cool!

Unfortunately, with our mild winter and unseasonably hot and dry conditions, I completely missed strawberry picking season.  I could make freezer jam with store-bought berries, but it’s just not as tasty. I was thinking about one of our favorite pies, cherry-peach, because I generally make a star-spangled one for the Fourth of July but was in a hotel this year and didn’t. Those flavors would be fabulous in jam I decided. Then we can have it whenever we want, on scones or waffles, without the trouble of making a pie. 

peach-cherry-jam
The results were just as I had hoped…sweet, tangy, a lovely color, and perfect on our cherry-almond scones (from a King Arthur mix) this morning. 

I love using these antique canning jars for freezer jams.  They’re missing all their rubber gaskets, so can’t be used for real canning anymore.  I found a whole box of them at a flea market in Vermont about fifteen years ago, and my GI Joe still wonders why I needed them. Silly boy.

Cherry Peach Freezer Jam

3 cups peeled and cubed peaches
14 oz can tart pie cherries, drained
4 cups sugar
½ tsp nutmeg
2 tsp almond extract
1 package Sure Jell
¾ cup water

1. Mash the fruit using a potato masher, or pulse until finely chopped (but not pureed) in food processor. Be sure you measure the exact amount of fruit to have 4 cups crushed.

2. Place fruit in large bowl and stir in sugar, nutmeg, and almond extract. Let sit ten minutes while you go find and wash your canning jars. I like to use glass, just because I like seeing it, but 8 oz plastic freezer containers with lids are great and much more practical.

3. Bring water and Sure Jell to a boil, stirring constantly. Boil for 1 minute, then stir into fruit and sugar mixture. Stir continuously for about 3 minutes, until all the sugar is dissolved and it doesn’t feel grainy between your fingertips.

4. Pour into prepared jars , replace lids, and let sit at room temperature for 24 hours before freezing. Keeps up to nine months in the freezer, or one month in the refrigerator.

Makes 7 cups

I store ours in pint jars, because the hooligans can devour some jam, but you can use 12 oz or 8 oz instead. Also, the amount of sugar disturbs me, but the tart cherries really need it, as well as the pectin not working correctly without the right amount of sugar. Next time I’m going to try low-sugar pectin, though, and use less sugar.

Click here for a printable version of the recipe