My blog has moved!

BREAKING NEWS!!!!
My blog has moved...Please visit me over at my new blog home:
http://www.chaosserveddaily.com/

You can sign up to follow via email or other paths there, and, if you do, please leave me a comment so I can thank you...and follow you back, if you'd like! Hope to see you there!

Thursday, December 8, 2011

Of Mice and (Snow) Men

bokeh-snowman And the fun continues….today I went to the kindergarten class to help with centers and read a book for storytime. We read The Snowman Band of Snowboggle Bend. Then the Star Student passed out packets of Snowman Soup for his classmates to take home. I’m pretty sure they’ll all eat the Peep and the candy cane on the bus, then dump the hot chocolate powder in their mouths. Oh, well, I can say I tried, at least!

snowman-soupI used my Big Shot to cut out the toppers, but when we make these in a couple of weeks for the 2nd grade, I think a 4 1/4” x 5 1/2” piece of cardstock will be perfect. The clipart poem I found online at Designs with Heart. The small cellophane bags are Stampin’ Up! and I just stapled them shut. You could do more, if you wish.

candy-cane-mouse

We made these candy cane mice for a treat earlier in the week. Of course, these never made it home…they inhaled the candy canes as soon as they received them. Again, I tried.

I’ve been making these for years, ever since I saw them in Martha Stewart Living. I used to make hobby horses that slid onto a candy cane, but these are much faster…the whole family (except Princess Thundercloud) helped cut them out, so it took no time at all. You can find the instructions here..

So there ya go…nothing original today, but some super cute projects for kids’ classes. If you want original, you may have to wait until after the holidays!

Wednesday, December 7, 2011

Dolphins in the Snow

My boys’ school mascot is a dolphin. Of course it is. What else would it be here in the middle of rural Wisconsin? Anyhoo, I found a very cool dolphin stamp in a small local store this fall and grabbed it, knowing I could find something to do with it for teachers.

dolphin-ornamentI wanted an ornament to tie on the homemade granola we’re giving as teacher gifts this year, and wanted to use that stamp. I think they’re super cool, and my kids love them, of course. The drawback here is that plastic ornaments have WAY too much static cling for the glitter, so I had to use glass. Hopefully they’ll make it to school without breaking. Perhaps I better help deliver them. And, by the way, if a school can have a dolphin mascot and think it's appropriate 2000 miles from the ocean, then I can certainly use it in a Christmas decoration!

To make these, stamp your image using Stazon ink on transparency film. Cut out a circle the same diameter as your ornament, centering your stamped image. Roll the circle into a tight tube and slide it into the neck of the ornament. I used the flattened circle ornaments rather than just spheres. The transparency is a little more stable that way and doesn’t shift around as much. Can you tell I’ve tried way too many times to get these things to work? But it was fun experimenting. I rolled up a paper into a funnel with a very small opening and taped it, then used that to pour some glitter in front and behind the transparency. I used white and blue glitter, since the school colors are blue, gray, and white.

Then I just replaced the ornament cap and tied on a stamped tag, jingle bell, and ribbon using silver elastic cord. I also wrote “2011” using a silver Sharpie, but it’s hard to see in the photo.

The granola recipe we use I found in Rachel Ray’s magazine last Christmas. It received rave reviews from everyone we gifted it to last year, and the kids really liked helping make it.

Berry Christmas Granola Recipe - Every Day with Rachael Ray

For now, it's back to the giftwrapping coal mine for me. There's an end in sight. I hope and pray.


A Not-Christmas Card

After spending the majority of my day yesterday wrapping Christmas and birthday gifts, I felt the need to make something non-Christmas related. I came up with this card, using a stamp set that has not seen anywhere near enough ink. I really need to use it more…when I was a coffee-guzzling Northwesterner, I HAD to have a coffee stamp set. Here in Wisconsin, I still drink coffee, but it’s from my Keurig, not one of a thousand coffee huts. Perhaps some of you are in the same boat. Here’s a card for you, if so!

toy-card

All Stampin’ Up!: Morning Cup and Curly Cute stamp sets
Tempting Turquoise, Tangerine Tango, and Whisper White Cardstock
Tempting Turquoise, Tangerine Tango, and Basic Gray markers
Scallop Edge Border, Scallop Trim Border, XL Oval, and Designer Label Punches

Inside, I put a piece of turquoise cardstock, 3x3, adhered on 3 sides, then slipped a teabag into it. Not only am I thinking of you, I’m sending you the means to make a tasty hot beverage. That’s how thoughtful I am. You could also put some of those little Starbucks Via instant coffee packets in, if you’re so inclined. Oh, and I have no idea what DSP pack the gray striped paper came from…but I’m sure you’re creative enough to improvise!

By the way, several of you have asked for the Manners subway sign I made. I’d be happy to give it to you, but it’s 10 megapixels, so I can’t figure out how to post it. Any suggestions? The limiting factor is that my internet sucks. I only have a wireless hotspot, no actual cable into the house. So it’s intermittently connected, on a good day. Some days I can’t hold a connection at all. So I’d appreciate any help anyone can provide!

I’m adding this 12 hours later….

See what I mean…I was unable to connect all afternoon and evening last night, so this post which I wrote yesterday afternoon was not even posted. ARGH!!!!

Monday, December 5, 2011

My Very Favorite Cranberry Recipe

My kindergartener is the “Star Student” this week, which means he gets to take a show and tell everyday, we filled out a little book all about him to share, and he can take special treats for the class each day. Needless to say, I’m happy that I finished almost all my holiday preparations last week. Anyway, we (and by that I mean “I” of course) needed to think of a clever treat for each day.

Today he took rainbow goldfish for his treat, because the box said it had “Finn Smiles” in it. His show and tell was the Matchbox HEMITT that St. Nicholas brought him last night. Tomorrow he wants to take his favorite fruit for a snack, and this is how you make it.

finished

Sugared Cranberries

These are THE BEST little snack. They’re best when really cold, though, so you have this amazing little explosion of sweet, tart, a little crunchy, and juicy.

2 cups water
2 cups sugar
12 oz. fresh cranberries
3/4 cup superfine sugar

soaking Combine the water and 2 cups sugar in a medium saucepan and heat until the sugar dissolves. If you accidentally bring it to a boil, let it cool a little before you put the berries in. When the sugar is dissolved and the syrup is hot, but not boiling, add the cranberries. Cover and let sit in the refrigerator for at least 8 hours. I usually do this in the morning and let them soak all day.

tossed Drain the berries (save the syrup for making yummy cranberry mojitos!) and toss with superfine sugar to cover them.

drying Spread them out on a cookie sheet lined with wax paper. Dry at room temp or in the refrigerator for at least an hour. When they’re dry, you can keep them covered in the refrigerator for a week or so. Actually, I’m not sure about that, since ours disappear in a day or two. Or less.

I know they sound a little odd, but we love these at our house. Last year we took them to the preschool Christmas party and almost started a riot, all the kids loved them so much. They require very little hands-on work time, but you do need to make them at least 12 hours before you need them. And believe me, you NEED these!

Friday, December 2, 2011

Subways in Rural Wisconsin

I’m a little obsessed with subway signs. Not real ones, but the facsimiles that are popping up all over the place. You've probably seen these...I even saw one on "Psych" in the police station this week. Yes, I spend way too much time watching mindless TV. But the police may need my help solving a crime someday and I'll be prepared, thanks to all the police shows I watch!


Create Subway Art

This was a free download I found. Cool, but not exactly what I wanted. You can find several examples for family, holidays, etc. online if you’re interested. Just Google “subway art” and add any other words like “family,” “advice,” “Christmas.”


Manners-Subway-Sign

I saw a similar manners one in a store when we were on a weekend escape, up in Door County. I then recreated it in Photoshop Elements and framed it for our kitchen. Maybe someday my hooligans will actually read and follow it. Probably not, but a mom can hope.


Then I wanted one for a specific gift for Christmas, so I had to design it myself. I used some digital scrapbooking quotes from Katie Pertiet at DesignerDigitals.com and some other quotes I found at TwoPeasInABucket.com. When you buy digi files, you’re allowed to use them for personal use only, not commercial purposes. So I’m breaking no laws here, people!

subway-tray I painted a plain wood tray from the craft store with chalkboard paint, because I wanted it to be flat black. Then I just printed our the subway sign and put it in the bottom. When my GI Joe gets home, he’s going to cut a piece of plexiglass to fit over it, to protect against spills.

I know, I could cut it myself…I’m the one who uses the glass and tile cutter in home renovations, after all. But I’m supposed to be decorating for Christmas today, so I’ll let him do it and feel like he’s made an actual gift.

Hope you have a fun and creative weekend!

Thursday, December 1, 2011

Getting a (Little) Fancy with Paper

You can only make so many Christmas cards before you burn out. Then I have to make something 3D and cute to reboot my card-making brain. Here are two quick ideas, if you need a little gift for someone…

votive Now that you can buy those LED tealights just about anywhere, I don’t worry about setting a paper votive holder aflame. I’m sure it can be done, especially in our house, but I don’t worry about it. To make these, just cut a square of cardstock 3x3, score each side 1/2” in, cut one short score on each corner, and fold up and adhere to make the base. The sides are a piece of DSP, 2-1/2”x 10”. Score it at 2-3/8”, 4-3/4”, 7-1/4”, and 9-5/8”.

Punch out a shape such as an ornament, star, or circle and adhere vellum behind the paper. Fold it along scores amd adhere the little flap you have leftover to make a bottomless box. I put a strip of Sticky Strip along the top and glittered mine before making it a box. Embellish as you like, and just set the box into the base. There ya go! Make a cute little row of them for a windowsill, matching whatever decor you have going. And I told you to buy a Simply Scored, didn’t I?

note-holder

These little note card or photo holders look cool grouped together, or use them to hold a recipe while you’re making it. Use the biggest binder clips you can find, cut a small strip of DSP and adhere it. Embellish, and it’s done.

We’re supposed to get a dusting of snow tonight…finally! Unfortunately, the front that’s bringing it is wreaking havoc on my head today, so I think I’ll go have a little nap before the hooligans’ bus arrives. Enjoy the rest of your December 1!

Wednesday, November 30, 2011

Sparkly, Shiny Gifts

How did Christmas get so close? Ack! These are some sparkly necklaces I saw on Martha Stewart’s show back in September, at the time thought they'd make great gifts. I even ordered the supplies I needed. Then I forgot to make them.

They’re made with this amazing stuff called Wirelace. It’s a tube of super fine woven wire. You can order it at wirelace.com (where else would you get it?) and they’re superfast with delivery; I think it was less than 3 days until I received it.
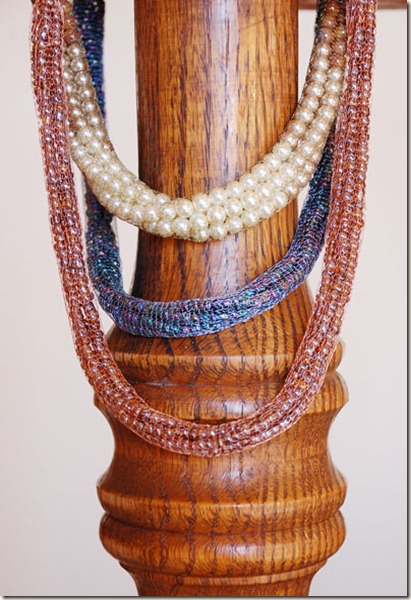
trioYou can find the directions on Martha’s website, or at Wirelace.com. The nice people at Wirelace also included a copy with my order, which was nifty.

supplies 6 mm beads, in 3 graduated colors or 3 strands of the same

monofilament to string them on

1 yard of Wirelace

Size 9 and Size ginormous (15 or 17) knitting needles

Jewelry findings: cones, jump rings, lobster claw clasps

closed-wire-lace Restring the beads on monofilament. If you’re doing the ombre look, like the neutral one above, refer to Martha’s instructions for stringing. It’s a little tedious, but since I have about a dozen sappy Hallmark Christmas movies on my DVR, I don’t mind.
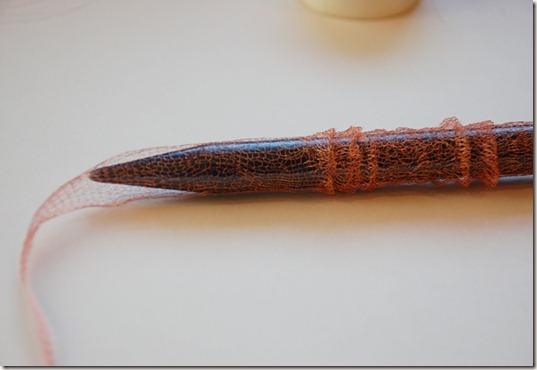
OPENING-UPUse the ginormous knitting needle to gently open up the wirelace all along its length.

READY-TO-THREADUse some sort of tape to secure the end of the monofilament to the smaller knitting needle. Be sure you cover the ends, as the wirelace will snag easily.

pulled-thruThread the needle with the bead strands attached through the wirelace….gently and without snagging. Center the bead strands in the wirelace and remove from knitting needle.

DSC_0012 Tie a knot at each end, making sure you catch all the monofilaments.

wire-loop Measure how long you want your necklace to be, and fold the wirelace there. Use a small wire loop to pull the wirelace through a jewelry cone.

clasp Attach a jump ring through the wirelace so it can’t slide back through the cone. Then attach a lobster claw clasp and you’re done…almost!

E6000 Cut off the excess wirelace…it cuts really easily with any scissors. Fill up the cone with some E600 or other handy dandy adhesive. Let it dry, and package it up prettily. Or hang it with your jewelry and enjoy wearing your creation!

If you get one of these from me for Christmas, act surprised! I’m not at all experienced with jewelry-making, but I think these turned out really well. Give it a try…it’s kind of addicting and pretty much instant gratification. It took a little less than an hour for each necklace, if you’re making a schedule!

And now I’m taking down my fall decorations and cleaning house in preparation for Christmas decorating. If I’m not mistaken, our Elf on the Shelf will be returning to our home tonight…if he’s not lost somewhere in the basement since our move! Wish me, I mean him, luck!