My blog has moved!

BREAKING NEWS!!!!
My blog has moved...Please visit me over at my new blog home:
http://www.chaosserveddaily.com/

You can sign up to follow via email or other paths there, and, if you do, please leave me a comment so I can thank you...and follow you back, if you'd like! Hope to see you there!

Thursday, May 10, 2012

Tinting Jars

Ever since we started this “No screens Monday through Thursday” back in January, the eldest hooligan constantly wants to do crafts with me after school.  I can sometimes talk him into a board game with me instead, but he’d rather help me.

This is a craft I’ve been wanting to try, so yesterday I let him tint these Mason jars.

DSC_0007


We followed a tutorial from Momtastic, which was very simple.  Basically, you mix food coloring with a tablespoon of water in a small bowl, one for each jar you’re tinting.  In each jar, place a couple of tablespoons of Glossy Mod Podge, then add the water/food coloring and mix well. 


We used Neon food coloring, ‘cause we live out loud around here.


DSC_0001Roll the jar around to coat the inside, over one of the small bowls. See, it’s so easy a child can do it!

DSC_0002
Let the jars drain and dry upside down on paper for about 30 minutes. I used freezer paper, but you could use a paper bag or wax paper, as well.

After they dried (and our dinner was out of the oven), we put them on a cookie sheet lined with wax paper and baked them in a 200 degree oven. Upside down for 10 minutes, then right side up for about 30 minutes, until none of the opacity remained.  Then I just turned the oven off and left them in there until this morning, to make sure they were good and dry.

There was a little bit of the mixture on the outside of the jars (hmmm, wonder how that happened?), so I put the lids on tightly this morning and washed them by hand.  It came off very easily.

DSC_0005
As you can see, though, it was still around the top on the outside, under the lid, so when I removed the lids, there’s a bit of opacity, but I’m sure it will dry transparently again.

This project was great for the hooligan…he saw how easy it was to make a beautiful jar, and I’m pretty sure he plans to “surprise” me with these on Mothers’ Day.

One word of caution, though…the tinting mixture is NOT waterproof, so only dry things can be stored in these.  They are non-toxic, however, so candy or nuts would be fine, or craft supplies. Hint, hint, hooligan.


Wednesday, May 9, 2012

A Plethora of Teacher Gifts

I know, I did it to myself.  I showed the hooligans all these teacher appreciation ideas I’d pinned on Pinterest. So of course each of them chose a different idea for their teacher. Plus another for the bus driver. Really?

Here goes!
DSC_0017
For Princess Thundercloud’s preschool teachers
(she actually agreed to give them both the same thing)

DSC_0027
The kindergartner chose a Sharpies and Smarties jar for his teacher and her aide.

DSC_0022
This was my favorite, for the second grader.  Although it was the most labor intensive, since I had to go to about 43 stores to find all the different candies. And you know how I hate to shop.

The label says “[Teacher’s Name], you totally ROCK (pop rocks)! You’re MOUNDS of fun and the RIESEN I love second grade. You help me learn to CRUNCH numbers and all sorts of EXTRA important things. You’re always KIND even when I act like an AIRHEAD.  I wish your PAYDAY could be 100GRAND! Here’s a giant thanks for putting up with my SNICKERS and silliness, and for helping me become a SMARTIE!”

The one I saw online was all on a posterboard, but I didn't like my mental picture of the hooligan trying to get that to school.

DSC_0025
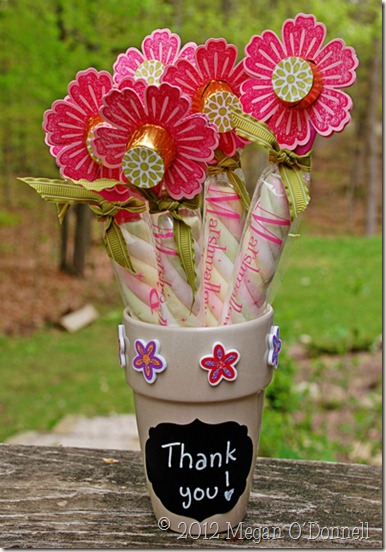
This “bouquet” for the bus driver was inspired by my friend Jennifer.  I added the flower stems made of marshmallow twists and ribbons as leaves. The label is chalkboard.

DSC_0026
The flowers Jennifer created are made by stamping using the Mixed Bunch set from Stampin’ Up!, along with the blossom punch, so it took very little time to do. I used Sticky Strip to make them hold together when upright.

DSC_0067
Last but certainly not least, these are the cups the parent organization gave to the staff at the boys’ school.  I got to fill them and tie on the ribbons and labels, with a little help from the hooligans.  I think they turned out really cute. They have candy and drink mixes in them.  If you were just giving them to a specific teacher, not 50 of them, it would be fun to put a gift card in there, too.

So, while I wish I could take credit for any of these, I really can’t.  I just put my own spin on things I found online…and you can, too!

Tuesday, May 8, 2012

A Genius Mothers’ Day Card

So if you’re my mom or mom-in-law, stop reading this immediately and come back next Monday to see the behind the scenes excitement if you wish.

If you’re not expecting a Mothers’ Day gift from me, read on.

I think this is a genius idea for a card/keepsake, totally involving the hooligans yet artsy enough to be displayed somewhere other than the frig. I was inspired by a Teacher Appreciation gift I’ve seen on various Pinterest boards.  See:

image

Anyway, I cut some watercolor paper to 5x7 then stamped three trees using the “Season of Friendship” stamp set.

DSC_0003Each kid then put a complete set of prints on “their” tree, using Lucky Limeade ink.  I was impressed they were able to do this by themselves, with little to no help from me.

DSC_0005
When they were all fingerprinted (I hope the FBI never needs those to solve a crime, but I’m not counting my chickens there), I added flowers in Pink Pirouette, So Saffron, and Bashful Blue. The centers are pearls, rhinestones, and chocolate pearls (shhh…those are not SU!).  I also wrote whose prints were whose, since grandmas like to know those things.  As will the FBI.

DSC_0004
Next I added a bit of DSP and a quotation from the “Pursuit of Happiness” stamp set. That Ralph Waldo Emerson was one deep dude.  Finally, I mounted the whole shebang on Lucky Limeade paper using kraft photo corners.  That way, they can put the fingerprint tree portion in a 5x7 frame if they would like.  But they’ve told me not to send them anything else in a frame, so I didn’t.

If they want to just shut those precious little prints from their adorable grandchildren in a drawer, so be it. It's on their heads.

Monday, May 7, 2012

Butterflies Bringing Treats

I often want a little box of some kind to put small treats in, and, of course, feel it needs to be handmade.  Here’s a butterfly-adorned box I created recently.  It’s a versatile design for any occasion, and I got to use glitter!

DSC_0018
To make the box portion, I cut a piece of cardstock 6”x 5” and one 5-7/8” x 4-7/8”.  I scored them an inch in on all four sides, clipped one score on each corner to make flaps, and folded them up to make an open-top box.  Then the two pieces fit together to make the box. I used my Big Shot and Top Note die to cut the top and bottom.

DSC_0017
To make the butterfly, I die cut Early Espresso cardstock using the Beautiful Butterflies die, then Heat-n-stick to adhere the glitter.  You could use any adhesive that evenly covers, though.  The background is Baja Breeeze cardstock embossed with the Elegant Lines folder, then I lightly rubbed a Whisper White craft ink pad over it, to highlight the embossing.

This was a fun and quick box to make, although I had a hard time stopping on the embellishments once I started!  Just one more pearl.  I try to make my cards like Jackie O’s advice on dressing…”When you’re ready to go out, remove the last accessory you put on, to avoid clutter."  I’m paraphrasing, but that’s the gist of it. So I’ll leave it up to you to wonder what fabulous touch I refrained from adding at the end!

By the way, this box is a perfect size for small homemade truffles for your mom.  Here’s a recipe I’ve used and found very tasty indeed, as is pretty much everything Ina Garten makes.

image

Of course, the recipe makes far too many truffles to fit in this box, so you’ll have to find another use for your leftover ones. Let me know if you need a suggestion, or my mailing address.

Friday, May 4, 2012

Any Excuse for a Fiesta!

In our multicultural family, we are lacking in Hispanic heritage.  We’ve got Filipino, African American, Navajo, and Cherokee covered, as well as our Irish and Italian ancestry.  But you know me, any excuse for a meal with a theme and I’m all over it!

My husband grew up in Denver, where there is a large Hispanic population, and I went to college there, so to say we like Mexican food is an understatement.  Our favorite place in Denver (no, it’s not Casa Bonita, surprisingly), used to be Chavez over on Sheridan and 38th (maybe…can’t remember for sure).  It was family run, and all the Chavez brothers served as the waitstaff.  They were charmers and incredible flirts.  Now that I think about it, I believe this was where my friends and I went for Mexican, not my then-boyfriend, now-husband.

When my friends told the Chavez boys I was moving to Seattle, they insisted I visit their uncle’s restaurant in Spokane on the way.  The name of it?  Joaquin’s Doughnut Hole.  Really.  I didn’t make it there, on any of the half dozen times we’ve moved to or from Washington State.

But I digress.  Here’s what we’ll be having for Cinco de Mayo…it all totally rocks!  I am using a couple photos from other sources, since I haven’t made this menu yet but wanted to post before the 5th of May. I mean, I’ve made all these recipes many times, I’m not making you be my guinea pigs.  I just didn’t take photos of all of them!

 Krista’s Beer-itas on the Rocks

12 oz. can frozen limeade concentrate
12 oz. tequila (use the limeade can to measure it)
12 oz. Mexican beer
12 oz. ginger ale, Sprite, or 7-Up (I prefer ginger ale)

Fill a large pitcher halfway with ice, add all ingredients, and stir it up. Rim your glasses with sale and enjoy with some chips and a mix of half guacamole, half salsa. If you’re not going to serve it all immediately (or very soon), leave the ice out and just put ice in each glass after you rim it.


Credit for these also goes to my amazing friend Krista.  I was living in Kansas and she was in Washington about 7 or 8 years ago when she told me how to make these. Someone in her neighborhood had brought them to a potluck.  They are beyond description in their deliciousness. If you're going to share them with more than about 4 people, make a double match. I'm serious, just do it.

Bacon-Pineapple-Jalapeno Poppers

12 fairly large fresh jalapenos
1 tub pineapple cream cheese
8 slices center cut bacon, cut in thirds

1. Preheat oven to 375 degrees.

2. Slice jalapenos in half lengthwise and scrape out seeds.  I do this under running water, so it doesn’t burn my eyes.  I usually wear gloves and whatever you do, DON’T RUB YOUR EYES! If it's warm, I even open the window over the sink to let the fumes out. I'm very delicate, you know.

3. Fill each half with a spoonful of pineapple cream cheese and wrap with 1/3 slice bacon.  Secure with a toothpick.  Place on a wire rack on a rimmed cookie sheet.

4. Bake for about 20 minutes, until bacon is fully cooked.

imageFor our entrĂ©e; we’re having my Chicken Verde Enchilada Stack.  You can find the recipe here, in a post from January . If I can find decent jicama, I'll make a slaw with jicama, cucumber, and cabbage with a cumin-lime vinaigrette.  My kids cannot get enough jicama, but it's rarely fit to eat in our grocery stores this far north.

For dessert, I’m making these Margarita Ice Cream Sandwiches.  I’ve made them several times since I saw it in Cooking Light magazine, and they are the bomb (or is it la bomba?).

image
photo and recipe from Cooking Light magazine

So whether you make one, all or none of these, here’s wishing you a Happy Cinco de Mayo as we celebrate Mexican heritage and freedom!  (Mexican Independence Day is not until September, so don’t go shootin’ off any fireworks or such craziness!)